Your app can imitate the Maps app, displaying a map interface and placing annotations and overlays on the map. UIView subclasses for displaying the map, along with the programming API, are provided by the Map Kit framework. You’ll link to MapKit.framework and import <MapKit/MapKit.h>. You might also need the Core Location framework to express locations by latitude and longitude; you’ll link to CoreLocation.framework and import <CoreLocation/CoreLocation.h>.
A map is displayed through a UIView subclass, an MKMapView. The map is potentially a map of the entire world; the map view is usually configured to display a particular area. An MKMapView instance can be created in code or through the nib editor. A map has a type, which is one of the following:
-
MKMapTypeStandard -
MKMapTypeSatellite -
MKMapTypeHybrid
The area displayed on the map is its region, an MKCoordinateRegion. This is a struct comprising a location (a CLLocationCoordinate2D), describing the latitude and longitude of the point at the center of the region (the map’s centerCoordinate), along with a span (an MKCoordinateSpan), describing the quantity of latitude and longitude embraced by the region and hence the scale of the map. Convenience functions help you construct an MKCoordinateRegion.
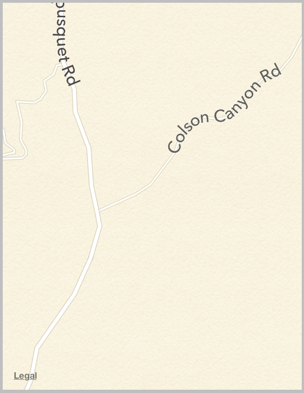
In this example, I’ll initialize the display of an MKMapView (map) to show a place where I like to go dirt biking (Figure 34.1):
CLLocationCoordinate2D loc =
    CLLocationCoordinate2DMake(34.924365,-120.217372);
MKCoordinateSpan span = MKCoordinateSpanMake(.015, .015);
MKCoordinateRegion reg = MKCoordinateRegionMake(loc, span);
self.map.region = reg;
An MKCoordinateSpan is described in degrees of latitude and longitude. It may be, however, that what you know is the region’s proposed dimensions in meters. To convert, call MKCoordinateRegionMakeWithDistance. The ability to perform this conversion is important, because an MKMapView shows the world through a Mercator projection, where longitude lines are parallel and equidistant, and scale increases at higher latitudes. This means, for example, that trying to display an MKCoordinateSpan with a fixed quantity of latitude will require the map to zoom out further at higher latitudes.
I happen to know that the area I want to display is about 1200 meters on a side. Hence, this is another way of displaying approximately the same region:
CLLocationCoordinate2D loc =
    CLLocationCoordinate2DMake(34.924365,-120.217372);
MKCoordinateRegionreg = MKCoordinateRegionMakeWithDistance(loc, 1200, 1200);
self.map.region = reg;
Another way of describing a map region is MKMapRect, a struct built up from MKMapPoint and MKMapSize. The earth has already been projected onto the map for us, and now we are describing a rectangle of that map, in terms of the units in which the map is drawn. The exact relationship between an MKMapPoint and the corresponding latitude/longitude coordinates is arbitrary and of no interest; what matters is that you can ask for the conversion (MKMapPointForCoordinate, MKCoordinateForMapPoint), along with the ratio of points to meters (which will vary with latitude: MKMetersPerMapPointAtLatitude, MKMapPointsPerMeterAtLatitude, MKMetersBetweenMapPoints). To determine what the map view is showing in MKMapRect terms, use its visibleMapRect property. Thus, this is yet another way of displaying approximately the same region:
CLLocationCoordinate2D loc =
    CLLocationCoordinate2DMake(34.924365,-120.217372);
MKMapPoint pt = MKMapPointForCoordinate(loc);
double w = MKMapPointsPerMeterAtLatitude(loc.latitude) * 1200;
self.map.visibleMapRect = MKMapRectMake(pt.x - w/2.0, pt.y - w/2.0, w, w);
In none of those examples did I bother with the question of the actual dimensions of the map view itself. I simply threw a proposed region at the map view, and it decided how best to portray the corresponding area. Values you assign to the map’s region and visibleMapRect are unlikely to be the exact values the map adopts in any case; that’s because the map view will optimize for display without distorting the map’s scale. You can perform this same optimization in code by calling these methods:
-
regionThatFits: -
mapRectThatFits: -
mapRectThatFits:edgePadding:
By default, the user can zoom and scroll the map with the usual gestures; you can turn this off by setting the map view’s zoomEnabled and scrollEnabled to NO. Usually you will set them both to YES or both to NO. For further customization of an MKMapView’s response to touches, use a UIGestureRecognizer (Chapter 18).
You can change programmatically the region displayed, optionally with animation, by calling these methods:
-
setRegion:animated: -
setCenterCoordinate:animated: -
setVisibleMapRect:animated: -
setVisibleMapRect:edgePadding:animated:
The map view’s delegate (MKMapViewDelegate) is notified as the map loads and as the region changes (including changes triggered programmatically):
-
mapViewWillStartLoadingMap: -
mapViewDidFinishLoadingMap: -
mapViewDidFailLoadingMap:withError: -
mapView:regionWillChangeAnimated: -
mapView:regionDidChangeAnimated:
An annotation is a marker associated with a location on a map. To make an annotation appear on a map, two objects are needed:
- The object attached to the MKMapView
-
The annotation itself is attached to the MKMapView. It consists of any instance whose class adopts the MKAnnotation protocol, which specifies a coordinate, a title, and a subtitle for the annotation. You might have reason to define your own class to handle this task, or you can use the simple built-in MKPointAnnotation class. The annotation’s
coordinateis its most important property; this says where on earth the annotation should be drawn. The title and subtitle are optional, to be displayed in a callout. - The object that draws the annotation
-
An annotation is drawn by an MKAnnotationView, a UIView subclass. This can be extremely simple. In fact, even a nil MKAnnotationView might be perfectly satisfactory: it draws a red pin. If red is not your favorite color, a built-in MKAnnotationView subclass, MKPinAnnotationView, displays a pin in red, green, or purple; by convention you are supposed to use these colors for different purposes (destination points, starting points, and user-specified points, respectively). For more flexibility, you can provide your own UIImage as the MKAnnotationView’s
imageproperty. And for even more flexibility, you can take over the drawing of an MKAnnotationView by overridingdrawRect:in a subclass.
Not only does an annotation require two separate objects, but in fact those objects do not initially exist together. An annotation object has no pointer to the annotation view object that will draw it. Rather, it is up to you to supply the annotation view object in real time, on demand, in the MKMapView’s delegate. This architecture may sound confusing, but in fact it’s a very clever way of reducing the amount of resources needed at any given moment. Think of it this way: an annotation itself is merely a lightweight object that a map can always possess; the corresponding annotation view is a heavyweight object that is needed only so long as that annotation’s coordinates are within the visible portion of the map.
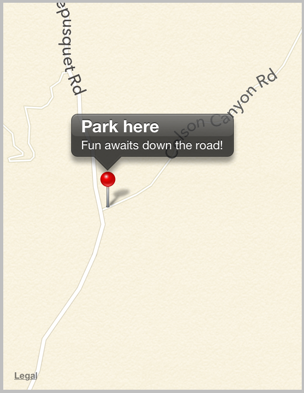
Let’s add the simplest possible annotation to our map. The point where the annotation is to go has been stored in an instance variable:
self.annloc = CLLocationCoordinate2DMake(34.923964,-120.219558);
We create the annotation, configure its properties, and add it to the MKMapView:
MKPointAnnotation* ann = [MKPointAnnotation new];
ann.coordinate = self.annloc;
ann.title = @"Park here";
ann.subtitle = @"Fun awaits down the road!";
[self.map addAnnotation:ann];
That code is sufficient to produce Figure 34.2. I didn’t implement any MKMapView delegate methods, so the MKAnnotationView is nil. But a nil MKAnnotationView, as I’ve already said, produces a red pin. I’ve also tapped the annotation, to display its callout, containing the annotation’s title and subtitle.
This location is a starting point, so by convention the pin should be green. We can easily create a green pin using MKPinAnnotationView, which has a pinColor property. To supply the annotation view, we must give the map view a delegate (MKMapViewDelegate) and implement mapView:viewForAnnotation:.
The structure of mapView:viewForAnnotation: is rather similar to the structure of tableView:cellForRowAtIndexPath: (Chapter 21), which is not surprising, considering that they both do the same sort of thing. Recall that the goal of tableView:cellForRowAtIndexPath: is to allow the table view to reuse cells, so that at any given moment only as many cells are needed as are visible in the table view, regardless of how many rows the table as a whole may consist of. The same thing holds for a map and its annotation views. The map may have a huge number of annotations, but it needs to display annotation views for only those annotations that are within its current region. Any extra annotation views that have been scrolled out of view can thus be reused and are held for us by the map view in a cache for exactly this purpose.
So, in mapView:viewForAnnotation:, we start by calling dequeueReusableAnnotationViewWithIdentifier: to see whether there’s an already existing annotation view that’s not currently being displayed and that we might be able to reuse. If there isn’t, we create one, attaching to it an appropriate reuse identifier.
Here’s our implementation of mapView:viewForAnnotation:. Observe that in creating our green pin, we explicitly set its canShowCallout to YES, as this is not the default:
- (MKAnnotationView *)mapView:(MKMapView *)mapView
            viewForAnnotation:(id <MKAnnotation>)annotation {
    MKAnnotationView* v = nil;
    if ([annotation.title isEqualToString:@"Park here"]) { ❶
        static NSString* ident = @"greenPin"; ❷
        v = [mapView dequeueReusableAnnotationViewWithIdentifier:ident];
        if (v == nil) {
            v = [[MKPinAnnotationView alloc] initWithAnnotation:annotation
                                                reuseIdentifier:ident];
            ((MKPinAnnotationView*)v).pinColor = MKPinAnnotationColorGreen;
            v.canShowCallout = YES;
        }
        v.annotation = annotation; ❸
    }
    return v;
}
The structure of this implementation of mapView:viewForAnnotation: is typical (though it seems pointlessly elaborate when we have only one annotation in our map):
|
We might have more than one reusable type of annotation view. (A view can perhaps be reconfigured and thus reused, but cannot be magically converted into a view of a different type.) Here, some of our annotations might be marked with green pins, and other annotations might be marked by a different sort of annotation view altogether. So we must first somehow distinguish these cases, based on something about the incoming annotation. Here, I use the annotation’s title as a distinguishing mark; later in this chapter, I’ll suggest a much better approach. |
|
|
After that, for each reusable type, we proceed much as with table view cells. We have an identifier that categorizes this sort of reusable view. We try to dequeue an unused annotation view of the appropriate type, and if we can’t, we create one and configure it. |
|
|
Even if we can dequeue an unused annotation view, and even if we have no other configuration to perform, we must associate the annotation view with the incoming annotation by assigning the annotation to this annotation view’s |
MKAnnotationView has one more option of which we might avail ourselves: when it draws the annotation view (the pin), it can animate it into place, dropping it in the manner familiar from the Maps app. All we have to do is add one line of code:
((MKPinAnnotationView*)v).animatesDrop = YES;
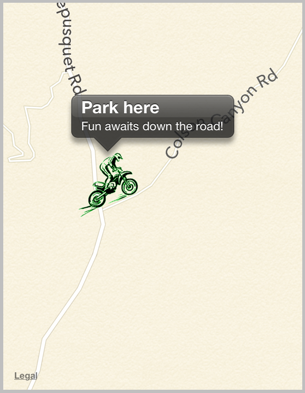
Now let’s go further. Instead of a green pin, we’ll substitute our own artwork. I’ll revise the code at the heart of my mapView:viewForAnnotation: implementation, such that instead of creating an MKPinAnnotationView, I create an instance of its superclass, MKAnnotationView, and give it a custom image showing a dirt bike. The image is too large, so I shrink the view’s bounds before returning it; I also move the view up a bit, so that the bottom of the image is at the coordinates on the map (Figure 34.3):
- (MKAnnotationView *)mapView:(MKMapView *)mapView
            viewForAnnotation:(id <MKAnnotation>)annotation {
    MKAnnotationView* v = nil;
    if ([annotation.title isEqualToString:@"Park here"]) {
        static NSString* ident = @"greenPin";
        v = [mapView dequeueReusableAnnotationViewWithIdentifier:ident];
        if (v == nil) {
            v = [[MKAnnotationView alloc] initWithAnnotation:annotation
                                              reuseIdentifier:ident];
            v.image = [UIImage imageNamed:@"clipartdirtbike.gif"];
            CGRect f = v.bounds;
            f.size.height /= 3.0;
            f.size.width /= 3.0;
            v.bounds = f;
            v.centerOffset = CGPointMake(0,-20);
            v.canShowCallout = YES;
        }
        v.annotation = annotation;
    }
    return v;
}
For more flexibility, we can create our own MKAnnotationView subclass and endow it with the ability to draw itself. At a minimum, such a subclass should override the initializer and assign itself a frame, and should implement drawRect:. Here’s the implementation for a class MyAnnotationView that draws a dirt bike:
- (id)initWithAnnotation:(id <MKAnnotation>)annotation
         reuseIdentifier:(NSString *)reuseIdentifier {
    self = [super initWithAnnotation:annotation
                     reuseIdentifier:reuseIdentifier];
    if (self) {
        UIImage* im = [UIImage imageNamed:@"clipartdirtbike.gif"];
        self.frame =
            CGRectMake(0, 0, im.size.width/3.0 + 5, im.size.height/3.0 + 5);
        self.centerOffset = CGPointMake(0,-20);
        self.opaque = NO;
    }
    return self;
}

- (void) drawRect: (CGRect) rect {
    UIImage* im = [UIImage imageNamed:@"clipartdirtbike.gif"];
    [im drawInRect:CGRectInset(self.bounds, 5, 5)];
}
The corresponding implementation of mapView:viewForAnnotation: now has much less work to do:
- (MKAnnotationView *)mapView:(MKMapView *)mapView
            viewForAnnotation:(id <MKAnnotation>)annotation {
    MKAnnotationView* v = nil;
    if ([annotation.title isEqualToString:@"Park here"]) {
        static NSString* ident = @"bike";
        v = [mapView dequeueReusableAnnotationViewWithIdentifier:ident];
        if (v == nil) {
            v = [[MyAnnotationView alloc] initWithAnnotation:annotation
                                             reuseIdentifier:ident];
            v.canShowCallout = YES;
        }
        v.annotation = annotation;
    }
    return v;
}
For ultimate flexibility, we should provide our own annotation class as well. A minimal annotation class will look like this:
@interface MyAnnotation : NSObject <MKAnnotation>
@property (nonatomic) CLLocationCoordinate2D coordinate;
@property (nonatomic, copy) NSString *title, *subtitle;
- (id)initWithLocation:(CLLocationCoordinate2D)coord;
@end

@implementation MyAnnotation
- (id)initWithLocation: (CLLocationCoordinate2D) coord {
    self = [super init];
    if (self) {
        self->_coordinate = coord;
    }
    return self;
}
@end
Now when we create our annotation and add it to our map, our code looks like this:
MyAnnotation* ann = [[MyAnnotation alloc] initWithLocation:loc];
ann.title = @"Park here";
ann.subtitle = @"Fun awaits down the road!";
[self.map addAnnotation:ann];
A major advantage of this change appears in our implementation of mapView:viewForAnnotation:, where we test for the annotation type. Formerly, it wasn’t easy to distinguish those annotations that needed to be drawn as a dirt bike; we were rather artificially examining the title:
if ([annotation.title isEqualToString:@"Park here"]) {
Now, however, we can just look at the class:
if ([annotation isKindOfClass:[MyAnnotation class]]) {
A further advantage of supplying our own annotation class is that this approach gives our implementation room to grow. For example, at the moment, every MyAnnotation is drawn as a bike, but we could now add another property to MyAnnotation that tells us what drawing to use. We could also give MyAnnotation further properties saying such things as which way the bike should face, what angle it should be drawn at, and so on. Our implementation of mapView:viewForAnnotation:, you’ll recall, assigns the annotation to the annotation view’s annotation property; thus, MyAnnotationView would be able to read those MyAnnotation properties and draw itself appropriately.
To add our own animation to an annotation view as it appears on the map, analogous to the built-in MKPinAnnotationView pin-drop animation, we implement the map view delegate method mapView:didAddAnnotationViews:. The key fact here is that at the moment this method is called, the annotation view has been added but the redraw moment has not yet arrived (Chapter 17). So if we animate the view, that animation will be performed at the moment the view appears onscreen. Here, I’ll animate the opacity of the view so that it fades in, while growing the view from a point to its full size; the only even mildly tricky bit is identifying the view:
- (void)mapView:(MKMapView *)mapView didAddAnnotationViews:(NSArray *)views {
    for (MKAnnotationView* aView in views) {
        if ([aView.reuseIdentifier isEqualToString:@"bike"]) {
            aView.transform = CGAffineTransformMakeScale(0, 0);
            aView.alpha = 0;
            [UIView animateWithDuration:0.8 animations:^{
                aView.alpha = 1;
                aView.transform = CGAffineTransformIdentity;
            }];
        }
    }
}
The callout is visible in Figure 34.2 and Figure 34.3 because before taking the screenshot, I tapped on the annotation, thus selecting it. MKMapView has methods allowing annotations to be selected or deselected programmatically, thus (by default) causing their callouts to appear or disappear. The delegate has methods notifying you when the user selects or deselects an annotation, and you are free to override your custom MKAnnotationView’s setSelected:animated: if you want to change what happens when the user taps an annotation.
A callout can contain left and right accessory views; these are the MKAnnotationView’s leftCalloutAccessoryView and rightCalloutAccessoryView. They are UIViews, and should be small (less than 32 pixels in height). You can respond to taps on these views as you would any view or control; as a convenience, a delegate method mapView:annotationView:calloutAccessoryControlTapped: is called when the user taps an accessory view, provided it is a UIControl.
An MKAnnotationView can optionally be draggable by the user; set its draggable property to YES and implement the map view delegate’s mapView:annotationView:didChangeDragState:fromOldState:. You can also customize changes to the appearance of the view as it is dragged, by implementing your annotation view class’s setDragState:animated: method. If you’re using a custom annotation class, you’ll also need to implement its setCoordinate: method; in our custom annotation class, MyAnnotation, that’s done automatically, as the coordinate property is synthesized and is not readonly.
Certain annotation properties and annotation view properties are automatically animatable through view animation, provided you’ve implemented them in a KVO compliant way (Chapter 13). For example, in MyAnnotation, the coordinate property is synthesized, so it is KVO compliant; therefore, we are able to animate the shifting of the annotation’s position:
[UIView animateWithDuration:0.25 animations:^{
    CLLocationCoordinate2D loc = ann.coordinate;
    loc.latitude = loc.latitude + 0.0005;
    loc.longitude = loc.longitude + 0.001;
    ann.coordinate = loc;
}];
MKMapView has extensive support for adding and removing annotations.
Warning
Annotation views don’t change size as the map is zoomed in and out, so if there are several annotations and they are brought close together by the user zooming out, the display can become crowded. Moreover, if too many annotations are being drawn simultaneously in a map view, scroll and zoom performance can degrade. The only way to prevent this is to respond to changes in the map’s visible region (for example, in the delegate method mapView:regionDidChangeAnimated:) by removing and adding annotations dynamically. This is a tricky problem, and it’s surprising that the API doesn’t give you any assistance with it.
An overlay differs from an annotation in being drawn entirely with respect to points on the surface of the earth. Thus, whereas an annotation’s size is always the same, an overlay’s size is tied to the zoom of the map view.
Overlays are implemented much like annotations. You provide an object that adopts the MKOverlay protocol (which itself conforms to the MKAnnotation protocol) and add it to the map view. When the map view delegate method mapView:viewForOverlay: is called, you provide an MKOverlayView and hand it the overlay object; the overlay view then draws the overlay on demand. As with annotations, this architecture means that the overlay itself is a lightweight object, and the overlay view is needed only if the part of the earth that the overlay covers is actually being displayed in the map view. An MKOverlayView has no reuse identifier.
Some built-in MKShape subclasses adopt the MKOverlay protocol: MKCircle, MKPolygon, and MKPolyline. In parallel to those, MKOverlayView has built-in subclasses MKCircleView, MKPolygonView, and MKPolylineView, ready to draw the corresponding shapes. Thus, as with annotations, you can base your overlay entirely on the power of existing classes.
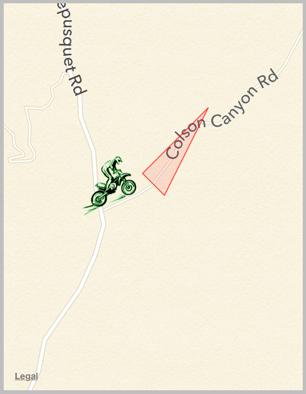
In this example, I’ll use MKPolygonView to draw an overlay triangle pointing up the road from the parking place annotated in our earlier examples (Figure 34.4). We add the MKPolygon as an overlay to our map view, and derive the MKPolygonView from it in our implementation of mapView:viewForOverlay:. First, the MKPolygon overlay:
CLLocationCoordinate2D loc = self.annloc;
CGFloat lat = loc.latitude;
CLLocationDistance metersPerPoint = MKMetersPerMapPointAtLatitude(lat);
MKMapPoint c = MKMapPointForCoordinate(loc);
c.x += 150/metersPerPoint;
c.y -= 50/metersPerPoint;
MKMapPoint p1 = MKMapPointMake(c.x, c.y);
p1.y -= 100/metersPerPoint;
MKMapPoint p2 = MKMapPointMake(c.x, c.y);
p2.x += 100/metersPerPoint;
MKMapPoint p3 = MKMapPointMake(c.x, c.y);
p3.x += 300/metersPerPoint;
p3.y -= 400/metersPerPoint;
MKMapPoint pts[3] = {
    p1, p2, p3
};
MKPolygon* tri = [MKPolygon polygonWithPoints:pts count:3];
[self.map addOverlay:tri];
Second, the delegate method, where we provide the MKPolygonView:
- (MKOverlayView *)mapView:(MKMapView *)mapView
        viewForOverlay:(id <MKOverlay>)overlay {
    MKPolygonView* v = nil;
    if ([overlay isKindOfClass:[MKPolygon class]]) {
        v = [[MKPolygonView alloc] initWithPolygon:(MKPolygon*)overlay];
        v.fillColor = [[UIColor redColor] colorWithAlphaComponent:0.1];
        v.strokeColor = [[UIColor redColor] colorWithAlphaComponent:0.8];
        v.lineWidth = 2;
    }
    return v;
}
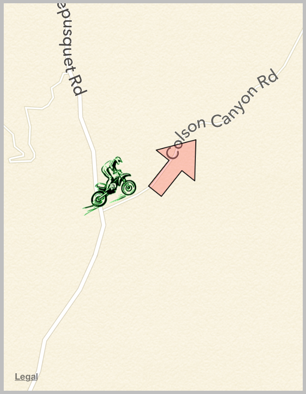
Now let’s go further. The triangle in Figure 34.4 is rather crude; I could draw a better arrow shape using a CGPath (Chapter 15). The built-in MKOverlayView subclass that lets me do that is MKOverlayPathView. To structure my use of MKOverlayView similarly to the preceding example, I’ll supply the CGPath when I add the overlay instance to the map view. No built-in class lets me do that, so I’ll use a custom class, MyOverlay, that implements the MKOverlay protocol.
A minimal overlay class looks like this:
@interface MyOverlay : NSObject <MKOverlay>
@property (nonatomic, readonly) CLLocationCoordinate2D coordinate;
@property (nonatomic, readonly) MKMapRect boundingMapRect;
- (id) initWithRect: (MKMapRect) rect;
@end

@implementation MyOverlay
- (id) initWithRect: (MKMapRect) rect {
    self = [super init];
    if (self) {
        self->_boundingMapRect = rect;
    }
    return self;
}
- (CLLocationCoordinate2D) coordinate {
    MKMapPoint pt = MKMapPointMake(
        MKMapRectGetMidX(self.boundingMapRect),
        MKMapRectGetMidY(self.boundingMapRect));
    return MKCoordinateForMapPoint(pt);
}
@end
Our actual MyOverlay class will also have a path property; this will be a UIBezierPath that holds our CGPath and supplies it to the MKOverlayView.
Just as the coordinate property of an annotation tells the map view where on earth the annotation is to be drawn, the boundingMapRect property of an overlay tells the map view where on earth the overlay is to be drawn. Whenever any part of the boundingMapRect is displayed within the map view’s bounds, the map view will have to concern itself with drawing the overlay. With MKPolygon, we supplied the points of the polygon in earth coordinates and the boundingMapRect was calculated for us. With our custom overlay class, we must supply or calculate it ourselves.
At first it may appear that there is a typological impedance mismatch: the boundingMapRect is an MKMapRect, whereas a CGPath is defined by CGPoints. However, it turns out that these units are interchangeable: the CGPoints of our CGPath will be translated for us directly into MKMapPoints on the same scale — that is, the distance between any two CGPoints will be the distance between the two corresponding MKMapPoints. However, the origins are different: the CGPath must be described relative to the top-left corner of the boundingMapRect — that is, the boundingMapRect is described in earth coordinates, but the top-left corner of the boundingMapRect is {0,0} as far as the CGPath is concerned. (You might think of this difference as analogous to the difference between a UIView’s frame and its bounds.)
To make life simple, I’ll think in meters; actually, I’ll think in chunks of 75 meters, because this turns out to be a good unit for positioning and laying out the arrow. In other words, a line one unit long would in fact be 75 meters long if I were to arrive at this actual spot on the earth and discover the overlay literally drawn on the ground. Having derived this chunk (unit), I use it to lay out the boundingMapRect, four units on a side and positioned slightly east and north of the annotation point (because that’s where the road is). Then I simply construct the arrow shape within the 4×4-unit square, rotating it so that it points in roughly the same direction as the road:
// start with our position and derive a nice unit for drawing
CLLocationCoordinate2D loc = self.annloc;
CGFloat lat = loc.latitude;
CLLocationDistance metersPerPoint = MKMetersPerMapPointAtLatitude(lat);
MKMapPoint c = MKMapPointForCoordinate(loc);
CGFloat unit = 75.0/metersPerPoint;
// size and position the overlay bounds on the earth
CGSize sz = CGSizeMake(4*unit, 4*unit);
MKMapRect mr =
    MKMapRectMake(c.x + 2*unit, c.y - 4.5*unit, sz.width, sz.height);
// describe the arrow as a CGPath
CGMutablePathRef p = CGPathCreateMutable();
CGPoint start = CGPointMake(0, unit*1.5);
CGPoint p1 = CGPointMake(start.x+2*unit, start.y);
CGPoint p2 = CGPointMake(p1.x, p1.y-unit);
CGPoint p3 = CGPointMake(p2.x+unit*2, p2.y+unit*1.5);
CGPoint p4 = CGPointMake(p2.x, p2.y+unit*3);
CGPoint p5 = CGPointMake(p4.x, p4.y-unit);
CGPoint p6 = CGPointMake(p5.x-2*unit, p5.y);
CGPoint points[] = {
    start, p1, p2, p3, p4, p5, p6
};
// rotate the arrow around its center
CGAffineTransform t1 = CGAffineTransformMakeTranslation(unit*2, unit*2);
CGAffineTransform t2 = CGAffineTransformRotate(t1, -M_PI/3.5);
CGAffineTransform t3 = CGAffineTransformTranslate(t2, -unit*2, -unit*2);
CGPathAddLines(p, &t3, points, 7);
CGPathCloseSubpath(p);
// create the overlay and give it the path
MyOverlay* over = [[MyOverlay alloc] initWithRect:mr];
over.path = [UIBezierPath bezierPathWithCGPath:p];
CGPathRelease(p);
// add the overlay to the map
[self.map addOverlay:over];
The delegate method, where we provide the MKOverlayPathView, is simple. We pull the CGPath out of the MyOverlay instance and hand it to the MKOverlayPathView, also telling the MKOverlayPathView how to stroke and fill that path:
- (MKOverlayView*)mapView:(MKMapView*)mapView
        viewForOverlay:(id <MKOverlay>)overlay {
    MKOverlayView* v = nil;
    if ([overlay isKindOfClass: [MyOverlay class]]) {
        v = [[MKOverlayPathView alloc] initWithOverlay:overlay];
        MKOverlayPathView* vv = (MKOverlayPathView*)v;
        vv.path = ((MyOverlay*)overlay).path.CGPath;
        vv.strokeColor = [UIColor blackColor];
        vv.fillColor = [[UIColor redColor] colorWithAlphaComponent:0.2];
        vv.lineWidth = 2;
    }
    return v;
}
The result is a much nicer arrow (Figure 34.5), and of course this technique can be generalized to draw an overlay from any CGPath we like.
For full generality, you could define your own MKOverlayView subclass; your subclass must override and implement drawMapRect:zoomScale:inContext:. The incoming mapRect: parameter describes a tile of the visible map (not the size and position of the overlay). The overlay itself is available through the inherited overlay property, and conversion methods such as rectForMapRect: are provided for converting between the map’s mapRect: coordinates and the overlay view’s graphics context coordinates.
In our example, we can move the entire functionality for drawing the arrow into an MKOverlayView subclass, which I’ll call MyOverlayView. Its initializer takes an angle: parameter, with which I’ll set its angle property; now our arrow can point in any direction. Another nice benefit of this architectural change is that we can use the zoomScale: parameter to determine the stroke width. For simplicity, our implementation of drawMapRect:zoomScale:inContext: ignores the incoming mapRect value and just draws the entire arrow every time it is called:
- (id) initWithOverlay:(id <MKOverlay>)overlay angle: (CGFloat) ang {
    self = [super initWithOverlay:overlay];
    if (self) {
        self->_angle = ang;
    }
    return self;
}

- (void)drawMapRect:(MKMapRect)mapRect zoomScale:(MKZoomScale)zoomScale
          inContext:(CGContextRef)context {
    NSLog(@"draw this: %@", MKStringFromMapRect(mapRect));
    CGContextSetStrokeColorWithColor(context, [UIColor blackColor].CGColor);
    CGContextSetFillColorWithColor(context,
        [[UIColor redColor] colorWithAlphaComponent:0.2].CGColor);
    CGContextSetLineWidth(context, 1.2/zoomScale);
    CGFloat unit = MKMapRectGetWidth([self.overlay boundingMapRect])/4.0;
    CGMutablePathRef p = CGPathCreateMutable();
    CGPoint start = CGPointMake(0, unit*1.5);
    CGPoint p1 = CGPointMake(start.x+2*unit, start.y);
    CGPoint p2 = CGPointMake(p1.x, p1.y-unit);
    CGPoint p3 = CGPointMake(p2.x+unit*2, p2.y+unit*1.5);
    CGPoint p4 = CGPointMake(p2.x, p2.y+unit*3);
    CGPoint p5 = CGPointMake(p4.x, p4.y-unit);
    CGPoint p6 = CGPointMake(p5.x-2*unit, p5.y);
    CGPoint points[] = {
        start, p1, p2, p3, p4, p5, p6
    };
    // rotate the arrow around its center
    CGAffineTransform t1 = CGAffineTransformMakeTranslation(unit*2, unit*2);
    CGAffineTransform t2 = CGAffineTransformRotate(t1, self.angle);
    CGAffineTransform t3 = CGAffineTransformTranslate(t2, -unit*2, -unit*2);
    CGPathAddLines(p, &t3, points, 7);
    CGPathCloseSubpath(p);
    CGContextAddPath(context, p);
    CGContextDrawPath(context, kCGPathFillStroke);
    CGPathRelease(p);
}
To add the overlay to our map, we still must determine its MKMapRect:
CLLocationCoordinate2D loc = self.annloc;
CGFloat lat = loc.latitude;
CLLocationDistance metersPerPoint = MKMetersPerMapPointAtLatitude(lat);
MKMapPoint c = MKMapPointForCoordinate(loc);
CGFloat unit = 75.0/metersPerPoint;
// size and position the overlay bounds on the earth
CGSize sz = CGSizeMake(4*unit, 4*unit);
MKMapRect mr =
    MKMapRectMake(c.x + 2*unit, c.y - 4.5*unit, sz.width, sz.height);
MyOverlay* over = [[MyOverlay alloc] initWithRect:mr];
[self.map addOverlay:over];
The delegate, providing the overlay view, now has very little work to do; in our implementation, it must supply an angle for the arrow:
- (MKOverlayView *)mapView:(MKMapView *)mapView
            viewForOverlay:(id <MKOverlay>)overlay {
    MKOverlayView* v = nil;
    if ([overlay isKindOfClass: [MyOverlay class]]) {
        v = [[MyOverlayView alloc] initWithOverlay: overlay
                                             angle: -M_PI/3.5];
    }
    return v;
}
That’s not an ideal architecture; the angle really should belong to the overlay and be passed along with it to the overlay view. But our code does draw the arrow and it does illustrate the basic use of a MKOverlayView subclass.
Our MyOverlay class, adopting the MKOverlay protocol, also implements the coordinate getter method to return the center of the boundingMapRect. This is crude, but it’s a good minimal implementation. The purpose of the MKOverlay coordinate property is to specify the position where you would add an annotation describing the overlay. For example:
// ... create overlay and assign it a path as before ...
[self.map addOverlay:over];
MKPointAnnotation* annot = [MKPointAnnotation new];
annot.coordinate = over.coordinate;
annot.title = @"This way!";
[self.map addAnnotation:annot];
The MKOverlay protocol also lets you provide an implementation of intersectsMapRect: to refine your overlay’s definition of what constitutes an intersection with itself; the default is to use the boundingMapRect, but if your overlay is drawn in some nonrectangular shape, you might want to use its actual shape as the basis for determining intersection.
Overlays are maintained by the map view as an array and are drawn from back to front starting at the beginning of the array. MKMapView has extensive support for adding and removing overlays, and for managing their layering order.
A device may have sensors that can determine its current location (Chapter 35). Map Kit provides simple integration with these facilities. Keep in mind that the user can turn off these sensors or can refuse your app access to them (in the Settings app, under Privacy → Location Services), so trying to use these features may fail. Also, determining the device’s location can take time.
You can ask an MKMapView in your app to display the device’s location just by setting its showsUserLocation property to YES. If your app has not been granted or denied access to Location Services, the system alert requesting authorization will appear. If access is granted, the map automatically puts an annotation at that location.
The userLocation property of the map view is an MKUserLocation, adopting the MKAnnotation protocol. It has a location property, a CLLocation, whose coordinate is a CLLocationCoordinate2D; if the map view’s showsUserLocation is YES and the map view has actually worked out the user’s location, the coordinate describes that location. It also has title and subtitle properties, plus you can check whether it is currently updating. You are free to supply your own annotation view to be displayed for this annotation, just as for any annotation.
Displaying the appropriate region of the map — that is, actually showing the part of the world where the user is located — is the responsibility of the map delegate’s mapView:didUpdateUserLocation: method:
- (void)mapView:(MKMapView *)mapView
        didUpdateUserLocation:(MKUserLocation *)userLocation {
    CLLocationCoordinate2D coordinate = userLocation.location.coordinate;
    MKCoordinateRegion reg =
        MKCoordinateRegionMakeWithDistance(coordinate, 600, 600);
    mapView.region = reg;
}
You can ask the map view whether the user’s location, if known, is in the visible region of the map (isUserLocationVisible).
MKMapView also has a userTrackingMode that you can set to determine how the user’s real-world location should be tracked automatically by the map display; your options are:
-
MKUserTrackingModeNone -
If
showsUserLocationis YES, the map gets an annotation at the user’s location, but that’s all. Deciding whether to set the map’sregioninmapView:didUpdateUserLocation:, as I’ve just shown, is up to you. -
MKUserTrackingModeFollow -
Setting this mode sets
showsUserLocationto YES. The map automatically centers the user’s location and scales appropriately. You should not set the map’sregioninmapView:didUpdateUserLocation:, as you’ll be struggling against the tracking mode’s attempts to do the same thing. -
MKUserTrackingModeFollowWithHeading -
Like
MKUserTrackingModeFollow, but the map is also rotated so that the direction the user is facing is up. In this case, theuserLocationannotation also has aheadingproperty, a CLHeading; I’ll talk more about headings in Chapter 35.
When the userTrackingMode is one of the follow modes, if the user is left free to zoom and scroll the map, and if the user scrolls in such a way that the user location annotation is no longer visible, the userTrackingMode may be automatically changed back to MKUserTrackingModeNone (and the user location annotation may be removed). You’ll probably want to provide a way to let the user turn tracking back on again, or to toggle among the three tracking modes.
One way to do that is with an MKUserTrackingBarButtonItem, a UIBarButtonItem subclass. You initialize MKUserTrackingBarButtonItem with a map view, and its behavior is automatic from then on: when the user taps it, it switches the map view to the next tracking mode, and its icon reflects the current tracking mode. (The behavior of MKUserTrackingBarButtonItem is a bit too automatic for my taste, however.)
New in iOS 6, you can ask the Maps app to display the device’s current location by starting with an MKMapItem returned by the class method mapItemForCurrentLocation.
This call doesn’t attempt to determine the device’s location, nor does it contain any location information; it merely generates an MKMapItem which, when sent to the Maps app, will cause it to attempt to determine (and display) the device’s location:
MKMapItem* mi = [MKMapItem mapItemForCurrentLocation];
[mi openInMapsWithLaunchOptions:
    @{MKLaunchOptionsMapTypeKey:@(MKMapTypeStandard)}];
The term geocoding refers to the translation of an address to a coordinate and vice versa. Geocoding functionality is encapsulated in the CLGeocoder class; to use it, you’ll need to link to CoreLocation.framework. Geocoding takes time and might not succeed at all, as it depends upon network and server availability; moreover, results may be more or less uncertain. Therefore, all geocoding methods take a completion handler which will eventually be called with two arguments:
-
NSArray* placemark - An NSArray of CLPlacemark objects. If things went really well, the array will contain exactly one CLPlacemark; if there are multiple placemark objects, the first one is the best guess. If nil, something went wrong.
-
NSError* error - If the placemark array was nil, this argument reports the reason things went wrong.
A CLPlacemark can be used to initialize an MKPlacemark, a CLPlacemark subclass that adopts the MKAnnotation protocol, and is therefore suitable to be handed directly over to an MKMapView for display. Here is an (unbelievably simple-minded) example that allows the user to enter an address in a UISearchBar (Chapter 25) to be displayed in an MKMapView:
-(void)searchBarSearchButtonClicked:(UISearchBar *)searchBar {
    NSString* s = searchBar.text;
    [searchBar resignFirstResponder];
    CLGeocoder* geo = [CLGeocoder new];
    [geo geocodeAddressString:s
            completionHandler:^(NSArray *placemarks, NSError *error) {
        if (nil == placemarks) {
            NSLog(@"%@", error.localizedDescription);
            return;
        }
        CLPlacemark* p = [placemarks objectAtIndex:0];
        MKPlacemark* mp = [[MKPlacemark alloc] initWithPlacemark:p];
        [self.map removeAnnotations:self.map.annotations];
        [self.map addAnnotation:mp];
        [self.map setRegion: MKCoordinateRegionMakeWithDistance
                                 (mp.coordinate, 1000, 1000)
                   animated: YES];
    }];
}
By default, the resulting annotation’s callout title contains a nicely formatted string describing the address.
That example illustrates forward geocoding, the conversion of an address to a coordinate. Instead of a string, you can provide a dictionary. Not surprisingly, the keys of this dictionary are exactly the keys you would get by extracting an address from the user’s address book (Chapter 31); thus, you can go quite directly from an address book contact to a coordinate.
The converse operation is reverse geocoding: you start with a coordinate — actually a CLLocation, which you’ll obtain from elsewhere, or construct from a coordinate using initWithLatitude:longitude: — and call reverseGeocodeLocation:completionHandler: in order to obtain an address. The address is expressed through the CLPlacemark addressDictionary property, which is an address in address book format; you can translate it to a string with ABCreateStringWithAddressDictionary. Alternatively, you can consult directly various CLPlacemark properties, such as subthoroughfare (such as a house number), thoroughfare (a street name), locality (a town), and administrativeArea (a state). These properties are present in a placemark resulting from forward geocoding as well; thus, one nice byproduct of forward geocoding is that it can format and complete an address, including adding a zip code (postalCode) to the address.
In this example of reverse geocoding, we have an MKMapView that is already tracking the user, and so we have the user’s location as the map’s userLocation; we ask for the corresponding address:
CLGeocoder* geo = [CLGeocoder new];
CLLocation* loc = userLocation.location;
[geo reverseGeocodeLocation:loc
          completionHandler:^(NSArray *placemarks, NSError *error)
  {
      if (placemarks) {
          CLPlacemark* p = [placemarks objectAtIndex:0];
          NSLog(@"%@", p.addressDictionary); // do something with address
      }
  }];
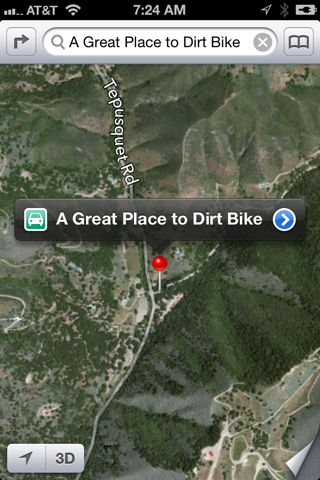
New in iOS 6, your app can communicate with the Maps app. For example, instead of displaying a point of interest in a map view in our own app, we can ask the Maps app to display it. This is useful because the Maps app can help the user in ways that our app may not be able to; for example, it can give the user turn-by-turn directions to a place, and the user can store a place as a bookmark. The channel of communication between your app and the Maps app is the MKMapItem class.
Here, I’ll ask the Maps app to display the same point marked by the annotation in our earlier examples, on a hybrid map portraying the same region of the earth (Figure 34.6):
MKPlacemark* p =
    [[MKPlacemark alloc] initWithCoordinate:self.annloc
                          addressDictionary:nil];
MKMapItem* mi = [[MKMapItem alloc] initWithPlacemark: p];
mi.name = @"A Great Place to Dirt Bike"; // label to appear in Maps app
NSValue* span = [NSValue valueWithMKCoordinateSpan:self.map.region.span];
[mi openInMapsWithLaunchOptions:
    @{MKLaunchOptionsMapTypeKey: @(MKMapTypeHybrid),
      MKLaunchOptionsMapSpanKey: span
    }
];
New in iOS 6.1, the MKLocalSearch class, along with MKLocalSearchRequest and MKLocalSearchResponse, lets you ask the Maps app to perform a natural language search for you. This is less formal than forward geocoding, described in the previous section; instead of searching for an address, you can search for a point of interest by name or description. In this example, I’ll do a natural language search for the same intersection displayed by our earlier examples, and I’ll display it with an annotation in our map view:
MKLocalSearchRequest* req = [MKLocalSearchRequest new];
req.naturalLanguageQuery =
    @"Tepusquet Road and Colson Canyon Road, Santa Maria, California";
MKLocalSearch* search = [[MKLocalSearch alloc] initWithRequest:req];
[search startWithCompletionHandler:
 ^(MKLocalSearchResponse *response, NSError *error) {
    MKMapItem* where = response.mapItems[0]; // I'm feeling lucky
    MKPlacemark* place = where.placemark;
    CLLocationCoordinate2D loc = place.location.coordinate;
    MKCoordinateRegion reg =
        MKCoordinateRegionMakeWithDistance(loc, 1200, 1200);
    [self.map setRegion:reg animated:YES];
    [self.map addAnnotation:place];
}];