Figure 10–1
You’re looking at a draft of a chapter from a work in progress, tentatively titled Scripting Mac Applications With Ruby: An AppleScript Alternative, by Matt Neuburg.
Covers rb-appscript 0.6.1. Last revised Jun 23, 2012. All content ©2012 by the author, all rights reserved.
Chapter 10: Examples
1. iTunes
1.1. Name Munging
1.3. Numbering Tracks
1.4. Export Tracks
1.5. Orphans
1.6. Displayed Columns
2. Safari
3.2. Automatic Cross-Reference Links
4.1. Drawing a Graph
4.2. Applying a Function
5.1. Laying Out a Grid
5.2. Populating Frames
5.4. Custom Dialogs
This chapter presents some examples of rb-appscript and Ruby in use, controlling Mac applications. Many of these examples come from my own real life, and solve real-life problems. There is more than one way to do just about anything, and everyone has different needs and different programming styles, so it’s very possible that none of this code corresponds exactly to what you need to accomplish or to how you would accomplish it. But it is hoped that an exposition of my own process of learning, thinking, and development may prove helpful to users at all levels.
iTunes has the merits of being freely available, highly scriptable, and (most important for our purposes) widely automated; this is why it is used for so many examples throughout in this book. I think of iTunes as primarily (1) a database and (2) an editor for audio file tags, but its interface is largely inadequate, especially when it comes to batch operations. Scripts are a popular solution to this problem. Huge quantities of AppleScript examples targeting iTunes may be found in such places as “Doug’s AppleScripts for iTunes” (http://dougscripts.com/itunes/).
My most frequent use of rb-appscript with iTunes is to perform some transformation upon the names (titles) of many songs at once. Typically I acquire those names from elsewhere and am unhappy with them. For example, let’s say I import a CD into iTunes. I want to attach tags to each track, so I have iTunes retrieve the track names from the Internet (using the Gracenote database, formerly CDDB). Now the tracks are identified, but there may be something about many or all of the names that I don’t like. I need a way to cycle through all the names, performing some transformation programmatically.
Let’s presume the tracks in question are sitting in some provisional playlist. The first problem is to specify those tracks. In my script, I could specify the playlist itself by name or ID, but that seems too restrictive; I am more likely to want the script to operate wherever I am working in iTunes at that moment. Thus, what we wish to cycle through is either all the tracks in the “current playlist” or just the currently selected tracks.
Use of help('-s') reveals that the currently selected tracks are directly available as the :application object’s selection property. But the current_playlist property is not doing me any good:
Help (-s)
Reference: nil
---- Properties ----
...
current_playlist:
UNAVAILABLE
...
selection:
[
    app("/Applications/iTunes.app").sources.ID('43').user_playlists.ID('114584').file_tracks.ID('114589'),
    app("/Applications/iTunes.app").sources.ID('43').user_playlists.ID('114584').file_tracks.ID('114590'),
    app("/Applications/iTunes.app").sources.ID('43').user_playlists.ID('114584').file_tracks.ID('114591')
]
...
Some experimentation reveals the reason: to iTunes, the current_playlist is the playlist containing the track that is currently playing (or paused). So I can reference the desired playlist by selecting a track within it and then clicking Play and then Pause, and then using current_playlist; but that seems an unreasonable requirement. I am looking at this playlist right now, in iTunes; doesn’t iTunes have a concept of the frontmost playlist, the one that’s selected right now in the iTunes window?
Hmm, the iTunes window. Maybe the way to approach this is through some kind of window element. Use of help('-r') nets this very promising result:
Help (-r)
Reference: nil
Relationships for application class
    -application
       |-current_encoder <encoder>
       |-current_EQ_preset <EQ_preset>
       |-current_playlist <playlist>
       |   |-parent <playlist> ->
       |   |=tracks ->
       |-current_track <track>
       |   |=artworks
       |-current_visual <visual>
       |=browser_windows
       |   |-view <playlist> ->
        ...
Aha. So there is a browser_windows element which contains a view property, and this property is itself a playlist. Is it our playlist? Let’s find out:
itu = Appscript.app("iTunes.app")
p itu.browser_windows[1].view.get
#=> app("/Applications/iTunes.app").sources.ID(43).user_playlists.ID(114584)
Yes, that’s the playlist that contains the selected tracks! So now we know how to specify, as it were, the frontmost playlist. Our script, therefore, is going to be structured around a loop built on one of two references. It might be the tracks that constitute the frontmost playlist:
itu = Appscript.app("iTunes.app")
trax = itu.browser_windows[1].view.tracks
Or it might be the tracks that are currently selected:
itu = Appscript.app("iTunes.app")
trax = itu.selection
Either way, trax is now a reference to a collection of tracks, and we want to investigate the name of each one, and change it if it is unsatisfactory.
So now, to complete the example, we need a task to be performed on each track. Let’s suppose there is something wrong with the encoding of the track names. Mac OS X and iTunes use UTF-8 encoding, but Windows users sometimes manage to specify track names in some nasty Windows encoding, such as CP1252 (also known as MS-ANSI). This can make nonsense of words containing non-ASCII characters; for example, French “modéré” appears as “modéré”. This is easily fixed with Ruby’s built-in Iconv library:
require 'iconv'
p Iconv.conv('CP1252', 'UTF-8', "modéré") #=> "modéré"
At a first approximation, therefore, our script should fetch the name of each track, pass it through this encoding conversion, and set the name to the result:
itu = Appscript.app("iTunes.app")
trax = itu.browser_windows[1].view.tracks.get
trax.each do |trak|
  s = trak.name.get
  s2 = Iconv.conv('CP1252', 'UTF-8', s)
  trak.name.set s2
end
This works (always a great relief). Observe that our approach is reliable, because even though we are changing the track names in real time, the track references in trax use ID numbers, so each reference continues to specify the correct track throughout the running of the script.
However, we should not be entirely satisfied, as we are sending way too many Apple events. This cannot always be avoided, and premature optimization is always a mistake, but as a matter of general technique it is reasonable to consider refining our script to behave efficiently.
Let’s talk first about how we get the track names. First we obtain an array of references to all the tracks; then we ask each track, individually, for its name. This is wasteful, since we can perfectly well obtain an array of all the names with a single Apple event:
itu = Appscript.app("iTunes.app")
trax = itu.browser_windows[1].view.tracks # no Apple event
names = trax.name.get # a single Apple event gathers all the names
We can then cycle through that array:
itu = Appscript.app("iTunes.app")
trax = itu.browser_windows[1].view.tracks
names = trax.name.get
names.each do |name|
  s2 = Iconv.conv('CP1252', 'UTF-8', name)
  # ... now what??? ...
We are now, however, in something of a quandary. We wish to set the name of some track to s2 — but what track? Previously we had an array of track references; now it appears that all we have is an array of strings, with nothing to point back to the original track. However, this is not entirely true. The variable trax is still a reference to the tracks whose names we have just obtained. True, it is not an array in the Ruby world (it’s an Appscript::Reference); but it is a reference to a collection that we can use to form element specifiers in the iTunes world. What sort of specifier? Well, we could use a name specifier:
itu = Appscript.app("iTunes.app")
trax = itu.browser_windows[1].view.tracks
names = trax.name.get
names.each do |name|
  s2 = Iconv.conv('CP1252', 'UTF-8', name)
  trax[name].name.set s2
end
However, this seems risky and unreliable, as we are specifying tracks by name in the course of a script that changes the names of those very tracks, and besides, track names within a playlist need not be unique. Very well, then, why don’t we specify the tracks by index? This will work, because the internal order of the tracks referred to by trax is the same order as the order in which iTunes gave us the strings that constitute the names array. The Ruby each_with_index method lets us easily keep track of each name’s index within the names array as we cycle through it:
itu = Appscript.app("iTunes.app")
trax = itu.browser_windows[1].view.tracks
names = trax.name.get
names.each_with_index do |name, ix|
  s2 = Iconv.conv('CP1252', 'UTF-8', name)
  trax[ix].name.set s2 # no no no no! off by one
end
But alas, as the comment warns, we have just fallen into the classic off-by-one trap. The problem is that to Ruby, giving us each ix in response to each_with_index, the first item in the names array is numbered 0; but to iTunes, working out what element we mean by the element specifier trax[ix], the first item in the internal array that we are referring to as trax is numbered 1, and our index numbering is consequently off by one the entire way through the loop. Thus the correct way to express this procedure is as follows:
itu = Appscript.app("iTunes.app")
trax = itu.browser_windows[1].view.tracks
names = trax.name.get
names.each_with_index do |name, ix|
  s2 = Iconv.conv('CP1252', 'UTF-8', name)
  trax[ix+1].name.set s2
end
Our script is now working correctly, but we are still sending too many Apple events! If our encoding conversion does not cause any alteration in the name of a given track, there is no need to change its name, and we are wasting an Apple event in doing so. It would be better to say something like this:
itu = Appscript.app("iTunes.app")
trax = itu.browser_windows[1].view.tracks
names = trax.name.get
names.each_with_index do |name, ix|
  s2 = Iconv.conv('CP1252', 'UTF-8', name)
  trax[ix+1].name.set s2 unless s2 == name
end
However, I’m still not happy with this. Frankly, it irks me that we are using the error-prone index-based element specification when iTunes lets us specify a track by the absolutely reliable ID. I prefer, therefore, to gather an array of both the names and the IDs of each track at the outset, even though this means the use of an extra Apple event. That way, I can use the ID as an element specifier to make each desired change. Ruby allows me to cycle easily through both the name array and the ID array together. Here, then, with all the inelegancies removed, is the completed script:
itu = Appscript.app("iTunes.app")
trax = itu.browser_windows[1].view.tracks
trax.name.get.zip(trax.id_.get).each do |name, id|
  newname = Iconv.conv('CP1252', 'UTF-8', name)
  trax.ID(id).name.set newname unless newname == name
end
But let’s make one more small modification. In real life, I am naturally hesitant to send any Apple event command, such as set, that will change things in the world of the scriptable application, lest it do damage. Thus, in my real script, I prefer to hedge my bets, writing something like this:
itu = Appscript.app("iTunes.app")
trax = itu.browser_windows[1].view.tracks
trax.name.get.zip(trax.id_.get).each do |name, id|
  newname = Iconv.conv('CP1252', 'UTF-8', name)
  unless newname == name
    puts "Changing '#{name}' to '#{newname}'"
    # trax.ID(id).name.set newname
  end
end
Thus I can do a “dry run” with the set line commented out. When I am reasonably sure the script will do the right thing, I can uncomment that line and run the script again. The puts line has the additional benefit of providing me with feedback while the script is changing the track names.
The really important thing is that, having solved this problem, we have solved an entire family of problems. It is trivial to adapt the structure of this script to transform track titles in many other ways. It’s just a matter of how the variable newname is set. I like to pass my track titles through a series of substitutions, which vary with the situation. For example, here I remove the composer’s name from the titles and make sure that no title contains any runs of multiple spaces:
newname = name.sub(/Debussy.*? /, "").gsub(/ {2,}/, " ")
This technique could obviously be extended, also, to operate on some other tag (artist, composer, album, whatever).
This is a direct variant on the previous example. Sometimes I’m not able to obtain titles online, or the downloaded titles are so bad that I need to edit each one by hand. It’s too much trouble to edit directly in iTunes; the interface is just too clumsy. It’s far easier to edit in a text file, using a decent editor such as BBEdit or TextMate. The first step might be to export all the titles to a text file (you might have to require 'pathname' to load the Pathname library):
itu = Appscript.app("iTunes.app")
names = itu.browser_windows[1].view.tracks.name.get
f = Pathname.new(ENV["HOME"]) + "Desktop/scratchpad.txt"
f.open("w") { |io| io.puts names }
Now we have either an exported text file (if we ran the above script) or an empty text file. Either way, we edit each line of the text file as necessary. Now we import the text file, applying each line to set the track names:
itu = Appscript.app("iTunes.app")
f = Pathname.new(ENV["HOME"]) + "Desktop/scratchpad.txt"
f.open do |io|
  itu.browser_windows[1].view.tracks.get.each do |track|
    track.name.set io.gets.chomp
  end
end
(Again, in real life I’d probably comment out the set line at first, inserting instead a line that outputs some sort of sanity check, to be certain that the right thing is going to happen.)
Sometimes we’d like to write multiple tags for each song to a text file, to be retrieved and used later. There are various ways to do this, but one particularly easy way is to take advantage of Ruby’s built-in support for YAML, a human-readable text format for expressing any data structure. To make the example as flexible as possible, we’ll encode the names of the desired properties as a list of symbols; that way, if you’re interested in a different set of properties, you can just change the list:
desiderata = [:name, :artist, :year, :album, :composer, :comment]
For each song, we’ll assemble a hash with those property names as keys, ending up with an array of hashes:
itu = Appscript.app("iTunes.app")
trax = itu.browser_windows[1].view.tracks.get
info = []
trax.each do |track|
  h = Hash.new
  desiderata.each {|n| h.store(n, track.send(n).get)}
  info << h
end
(For this use of the send command, see “Assembling References at Runtime” in Chapter 5.) Now we can write out the array of hashes in one easy move:
f = Pathname.new(ENV["HOME"]) + "Desktop/scratchpad.yaml"
f.open('w') { |out| YAML.dump(info, out) } # may have to require 'yaml' first
The result is a text file in a format like this:
---
- :artist: Blind Lemon Jefferson
  :name: Black Snake Moan
  :album: String Dazzlers
  :composer: Blind Lemon Jefferson
  :year: 0
  :comment: ""
- :artist: Blind Lemon Jefferson
  :name: Broke and Hungry Blues
  :album: King of the Country Blues
  :composer: Blind Lemon Jefferson
  :year: 1985
  :comment: ""
And so on. We can then edit this text file by hand if we like, and we can later read in the text file with YAML and, presto, we instantly have an array of hashes, suitable for setting the properties of every track in the playlist:
f = Pathname.new(ENV["HOME"]) + "Desktop/scratchpad.yaml"
info = f.open { |io| YAML.load(io) }

itu = Appscript.app("iTunes.app")
trax = itu.browser_windows[1].view.tracks.get

trax.zip(info).each do |track, an_info|
  an_info.each do |k,v|
    track.send(k).set(v)
  end
end
Exporting track names (or more extended information about tracks) to a text file is useful not only for editing but also as a form of insurance. I often do this just before performing some sweeping change to a playlist’s track tags. If things turn out wrong, I just restore the saved track tag data from the text file.
The absence of a track-numbering command from the iTunes comes as a frequent surprise to users. Track numbering is tremendously important in iTunes, especially when preparing songs for transfer to an iPod, where it determines the order of play when accessing songs by album. I frequently label songs artificially with an album designation for easy categorized iPod access (e.g. “Bach Cantatas”), in preference to a playlist; then I need to number the tracks to set the song order within that album.
This script numbers all the tracks in the frontmost playlist; you could alternatively number just the currently selected tracks, as described earlier.
itu = Appscript.app("iTunes.app")
trax = itu.browser_windows[1].view.tracks.get
i = 0
u = trax.length
trax.each do |trak|
  trak.track_count.set(u)
  trak.track_number.set(i += 1)
end
When sending tracks from a playlist to a friend (on a CD-ROM, for example), I like to number not only the tracks, as shown in the previous example, but also the names of track files. That way, even if my friend doesn’t use iTunes or an iPod, the tracks themselves, as files, are in the same order as the playlist. So this script copies the track files in the frontmost playlist, assigning the copies new filenames, where each filename starts with a number. The numbers have leading zeroes to ensure they will be ordered correctly even using crude ASCII sorting. The new filenames are also stripped of non-ASCII characters, so they won’t be problematic even on a Windows machine.
We start by requiring some needed libraries. Then we define a utility for cleaning up the filenames.
require 'appscript'
require 'osax'
require 'fileutils'
require 'pathname'

class String
  def clean
    return self.gsub(/[^abcdefghijklmnopqrstuvwxyz1234567890_\s]/i, "")
  end
end
We bring iTunes to the front and present a Choose Folder dialog (see Chapter 9):
itu = Appscript.app("iTunes.app")
itu.activate
where = OSAX.osax(nil, "iTunes.app").choose_folder(
  :with_prompt => "Folder to export to:") rescue exit
where = Pathname.new(where.path)
We gather, in just two Apple events, the locations (file pathnames) and titles (names) of the tracks; the plan is that the new filenames should be based on the titles, not on the existing filenames.
trax = itu.browser_windows[1].view.tracks
lox = trax.location.get.map { |loc| Pathname.new(loc.path) }
namz = trax.name.get
For the numeric prefix on the new filenames, we need to know how many digits to require when padding with leading zeroes. The answer is the first integral power of ten larger than the number of files. Good thing I was paying attention when they told us about logarithms in high school.
fmt = "%0#{Math::log10(namz.length).floor + 1}i" # format string for sprintf, padding
Now we create an array of the new filenames.
i = 0
new_names = namz.map do |nam|
  (sprintf(fmt, (i += 1)) + " " + nam).clean
end
We’re finally ready to copy the files, assigning the new names. We know the current path of each track file (lox), the destination folder (where), and the new names (new_names). The file extension comes from the original file. The :verbose parameter gives us nice output that shows our progress as the files are copied.
lox.zip(new_names) do |loc, new_name|
  newloc = (where + new_name).to_s + loc.extname
  FileUtils.cp loc.to_s, newloc, :verbose => true
end
The problem here is to identify those songs that are in the full “Music” playlist but not in any other playlist. Since I access all my songs through playlists that categorize them, such a song is effectively an “orphan” — I will never find or play it. Every once in a while I run this script to see whether I have any orphans and, if so, I add each one to some playlist.
The problem should be trivial to solve, but it is not. If you control-click on a track in iTunes, you will see a menu item “Show in Playlist”, which lists all the playlists to which this track belongs. This suggests that internally iTunes keeps its data double-linked: every playlist knows what tracks it contains, and every track knows what playlists it belongs to. However, in the scriptability API, there is no way to ask a track what playlists it belongs to. We are therefore compelled to work entirely from the top down, starting with playlists.
Our strategy is simple. We will gather all the tracks in the full “Music” playlist into an array. We will also gather all the tracks in the other playlists into a second array. We will then remove from the first array every track that appears in the second array. Whatever is left in the first array is an orphan.
Let’s start with the second array. Before we can form it, we need to identify what we mean by “the other playlists”. We will gather an array of the IDs of these playlists. This will vary from user to user, so you may need to modify this part of this script to match your situation. On my machine:
Only user playlists are of interest. To see what I mean, look at the inheritance hierarchy with help("-i playlist"):
     -item
  ->    |-playlist
            |-audio_CD_playlist
            |-device_playlist
            |-library_playlist
            |-radio_tuner_playlist
            |-user_playlist
                |-folder_playlist
The only :library_playlist instance is the main “Library”. I don’t care about this, or about audio CDs, devices (iPods), or radio stations. Thus, only user playlists are left.
Folders are not of interest. It would be silly to gather all the tracks in a folder, because I’m going to gather those same tracks again when I gather the tracks in each playlist within that folder. Unfortunately, in the inheritance hierarchy, :folder_playlist inherits from :user_playlist, so if I gather the latter I gather the former. Fortunately, there is another way to distinguish folders: if a playlist is a folder, its special_kind property is :folder.
Smart playlists are not of interest to me. Having a song appear automatically in a playlist does not rescue it, in my definition, from being an orphan. Also, the “Music” playlist is itself a smart user playlist. (Why it counts as a user playlist when the user has no control over it beats me. This is the sort of quirk you have to accept when you’re working with a scriptable application.) We can identify non-smart playlists because their smart property is false.
We are ready to start by gathering the IDs of the playlists that meet the above criteria. Here we go:
itu = Appscript.app("iTunes.app")
whose = Appscript.its
playlist_ids = itu.user_playlists[whose.special_kind.ne(:folder).and(whose.smart.eq(false))].id_.get
The array playlist_ids now contains the IDs of the playlists whose tracks we’re interested in. We next proceed to gather all the tracks from each of those playlists. In particular, we gather the database_ID property value of each of those tracks. A track’s ID (id_) is guaranteed to be a unique identifier for access through a particular playlist, but the same track can appear in different playlists with different IDs; a track’s database_ID, on the other hand, is the same throughout the database, without regard to any particular container.
track_ids = []
playlist_ids.each do |id|
  begin
    track_ids |= itu.playlists.ID(id).file_tracks.database_ID.get
  rescue
    # ignore empty playlists
  end
end
The use of the |= operator actually invokes the Ruby Array “|” instance method (see “Method Calling and Syntactic Sugar” in Chapter 2), which takes the union of two arrays. Thus, no database_ID value will appear twice in the track_ids array. We gather only :file_track IDs (other kinds of track are of no interest to me), and there is a rescue clause because if a playlist happens to be empty, the attempt to fetch a property of its file tracks will raise an exception.
Now let’s proceed to the first array — the IDs of everything in the “Music” playlist.
library_ids = itu.user_playlists["Music"].tracks.database_ID.get
Notice that we ask for tracks even through we are interested only in file_tracks. This is a speed optimization. For some reason, gathering file_tracks of the “Music” playlist is extremely slow. This is a quirk of this particular scriptable application, iTunes, and is discovered and (fortunately) worked around by experimentation.
Finally we are ready to isolate our orphans. All we have to do is literally subtract the second array from the first. The Ruby Array “-” instance method obtains the difference between two arrays, leaving us with everything in the first that is not also in the second. So now we have our array of database_ID values identifying each orphan. To display the result to the user, we use each database_ID as a key to the actual track; we make sure it is a :file_track, and if it is, we fetch its name and output it.
(library_ids - track_ids).each do |orphan|
  t = itu.user_playlists["Music"].tracks[whose.database_ID.eq(orphan)].get[0]
  if (t.class_.get == :file_track)
    p t.name.get
  end
end
On my machine, with dozens of playlists and about 19,000 songs, that script runs in less than 6 seconds. I challenge anyone to approach that speed using AppleScript alone. (My challenge is safe, because access to AppleScript’s equivalent of a Ruby array, a list, becomes slow when the list becomes large.)
For some reason, iTunes doesn’t let you define column defaults for a new playlist. Thus, on my machine, playlists are often created containing columns I don’t want. So I’ve written a script to remove the unwanted columns.
Some things are not exposed to the scriptability API, and this is one of them. If you look in iTunes’s dictionary you won’t see anything about visible columns of a playlist. In order to remove the unwanted columns, we must resort to more primitive means, effectively compelling the computer to simulate the very same mouse gestures that a human being would use to do the same thing: choose View > View Options to summon the View Options dialog, click the checkboxes in question to uncheck them, and click OK to dismiss the dialog. Mac OS X permits us to do this sort of thing with most applications, provided “Enable access for assistive devices” is checked in the Universal Access pane of System Preferences. The faceless utility application System Events provides the scriptability access for reading and clicking interface elements. This way of making things happen on your Mac is called GUI Scripting.
This version of the script removes the “Rating”, “Genre”, “Last Played”, and “Play Count” columns from the currently active playlist. It would be easy to wrap it in a larger script so as to perform this action for every playlist.
se = Appscript.app("System Events.app")
Appscript.app("iTunes.app").activate
itu = se.application_processes["iTunes"]
sleep 1
itu.menu_bars[1].menu_bar_items["View"].menus[1].menu_items["View Options…"].click
sleep 1
checkboxes = itu.windows["View Options"].checkboxes
["Rating", "Genre", "Last Played", "Play Count"].each do |name|
  if checkboxes[name].value.get == 1
    checkboxes[name].click
    sleep 0.5
  end
end
itu.windows["View Options"].buttons["OK"].click
The script is typical of GUI Scripting. We activate the target application, but we refer to it indirectly as an application process of System Events. We then refer to any desired interface elements by working our way down the interface’s view hierarchy. The script does, as I said before, exactly what a human would do. We click the View > View Options menu item to summon the View Options dialog. Then we examine each target checkbox by name, fetching its value, to see if it is checked. If it is, we click it. When we’re all done, we click the OK button. Notice the liberal use of sleep commands to pause between actions; this is crucial to the success of GUI Scripting scripts, in part because overly rapid clicking is interpreted as double-clicking, and in part because the interface needs a chance to “settle down” after each click (for example, we can’t work in the View Options dialog until it has had time to open).
Here’s a single example of scripting Safari, but it isn’t really about Safari at all: it’s about showing off how easy it is to parse HTML and dates, thanks to various Ruby libraries. In this case, we’ll use Hpricot to parse HTML, so install it if you don’t already have it (sudo gem install hpricot).
The problem comes from my real life. When I write an article for TidBITS that cites another TidBITS article, the citation has to be in a certain format: the article title in quotation marks, followed by a comma, followed by the article date in the format YYYY-MM-DD. In general, at the moment I want to create this citation, I’m looking right at the target article in Safari. So our script grabs the source from the frontmost Safari window, and then plumbs the HTML to obtain the article’s date and title. The date is in the wrong format, so we parse it and rearrange it. The script relies upon detailed facts about how a TidBITS article’s HTML is structured, and will of course break if those details change; but that’s okay, since we can just change the script.
First we load the required library and grab the frontmost Safari document’s source.
require 'hpricot' # might have to require 'rubygems' first
src = Appscript.app("Safari.app").documents[1].source.get
Now we parse the document’s HTML, and extract the <div> element whose class attribute is "article":
header = Hpricot.parse(src).at("div[@class='article']")
That <div> element contains both the article title and the article date. The title is contained in an <h2> element:
title = header.at("h2").inner_html
The date is contained in a <div> element whose class is "meta_article"; it isn’t delimited directly by any tags, but it is surrounded by pipe characters and space characters, so we can find it with a regular expression.
header.at("div[@class='meta_article]").inner_html =~ /\| (.*?) \|/
Finally, we parse the date string, rearrange it into the desired format, assemble it together with the title, and output the entire result.
date = Date.parse($1).strftime('%Y-%m-%d')
puts "\"#{title},\" #{date}"
Microsoft Word is extraordinarily scriptable, but it has a cumbersome object model, verbose terminology, and an unusually large number of commands, because of its VBA heritage (Visual Basic for Applications). The dictionary is huge; the Office Developers Web page (http://www.microsoft.com/mac/developers/default.mspx) contains a link to the useful “Microsoft Word 2004 AppleScript Reference” PDF document, and there is a lengthy online article (http://www.mactech.com/vba-transition-guide/index-019.html) that is quite honest about the details of Word’s scriptability. My examples are tested with Word 2004, which is still widely used; I don’t know whether any of the scriptability quirks I work around in these examples are fixed in Word 2008.
My experience with scripting Microsoft Word is derived mostly from the requirements of preparing Take Control book manuscripts. These requirements are rather specialized, but they illustrate some common basic techniques.
Manipulation of a Word document’s text usually involves some object’s text_object property, which is a :text_range instance. For example, to learn the text of the fifth paragraph of the first document, we would say this:
mw = Appscript.app("Microsoft Word")
p mw.documents[1].paragraphs[5].text_object.content.get #=> "By Matt Neuburg\r"
(As you can see, a paragraph’s range includes its final return character.) Just about everything has a text_object property, including the selection; and many, many commands manipulate or return a :text_range. Thus, it is will not surprise you that my examples are mostly about dealing with a :text_range (which I’ll just refer to as a “range”) in one way or another.
Imagine that we have a lengthy Word document containing a number of figures (pictures, drawings, screen shots, that sort of thing), and that every figure is to have a caption that numbers it: “Figure 1,” “Figure 2,” and so on. And suppose that for one reason or another, we don’t want to use Word’s automatic numbering. Well, there’s no point assigning actual numbers to the figure captions until we’re nearly finished editing the document, because until then, figures can be added, deleted, and rearranged. So at a late stage of the document’s development we want to cycle through all the figure captions and add the numbers.
To help us, the figure captions all sit in paragraphs of their own, and these paragraphs have a special style, called “Figure Number”. Thus it will suffice to start at the beginning of the document and find each stretch of “Figure Number” text in turn, giving each one the content “Figure 1,” “Figure 2,” and so on. This sounds like a repeated “find” operation. A repeated “find” is often the best practical way of navigating a Microsoft Word document, and is one of the main things that scripters want to know how to do (which is what makes this such a good example).
We’ll presume our script is to operate in the frontmost Word document. This is not documents[1] as it would be in most object models; Word does number its documents, but not from front to back. Instead, we’ll use the :application object’s active_document property.
mw = Appscript.app("Microsoft Word")
active = mw.active_document
We’re also going to be making use of the singleton :selection_object object, accessed through the top-level selection property. We do not need to specify any particular document, because there is only one active application-wide selection, namely the selection in the active document window.
selection = mw.selection
To put the selection point at a certain position in the document, one approach is to specify a range, with the create_range command, and select it. The range is specified in terms of the character positions of its start and end. Recall that end is a “reserved word” in rb-appscript, so the AppleScript command parameter name end is rendered :end_ with a final underscore. So this line puts the selection point at the start of the document:
active.select active.create_range(:start => 0, :end_ => 0)
We now prepare to a find stretch of text in the “Figure Number” paragraph style. This involves manipulating a :find object. There are two ways to get one: as the find_object of a range, and as the find_object of a selection. In my experience manipulating the latter is more reliable. Doing so causes the selection itself to change: as we perform each find, the found text is selected. This is actually a good thing, because it makes development and debugging of the script a lot easier. So that’s what we’ll use.
f = selection.find_object
We begin by initializing the :find object, setting a whole series of properties that determine how it will behave when it is told to perform an actual find operation. This is to make certain that the :find object’s settings are the ones we want, not whatever may have been previously in force.
f.clear_formatting
f.content.set ""
f.forward.set true
f.wrap.set :find_stop
f.match_case.set false
f.match_whole_word.set false
f.match_wildcards.set false
f.match_sounds_like.set false
f.match_all_word_forms.set false
Observe that we specify that we will find forwards and that our wrapping behavior will be :find_stop. This means that when we’ve found the last sought item in the document, we won’t wrap around and start finding from the beginning again.
Now we specify that formatting counts in this search, and in particular that what we’re seeking is a stretch of the “Figure Number” style.
f.format.set true
f.style.set "Figure Number"
We are at last ready to perform the find, which we do by sending the find object the execute_find command:
f.execute_find
This brings us to the issue of how we are going to know when we have found the last “Figure Number” stretch in the document. Microsoft Word’s dictionary and scripting documentation claim that execute_find command will return false at that point. But my testing shows nothing of the kind! This is a typical example of the buggy, unreliable behavior of Microsoft Word scripting. Fortunately the :find object has a found property which does work. So our search will actually be performed in a loop that looks like this:
while true
  f.execute_find
  break if not f.found.get
end
However, there’s a complication. (There always is.) Once we have found, and therefore selected, a stretch of “Figure Number” text, the next find operation can find the same stretch of text that we’re already in. This can put us into an infinite loop where we keep selecting the same stretch of text over and over. Therefore it is necessary, after each find, to move the selection past the stretch of text we just found! Thus we end up with a loop structure like this (we are still not yet numbering any figures; all we’re doing is learning how to cycle through the “Figure Number” texts):
while true
  f.execute_find
  break if not f.found.get
  past = selection.selection_end.get + 1
  active.select active.create_range(:start => past, :end_ => past)
end
At last we are ready to do what we came here to do, namely to insert some numbering. Since, after each find, we are going to move forward past the found text, we first memorize our position (the selection at that moment). Then, after we have moved forward past the found text, we insert the “Figure n” text at the position we just memorized. We can do this without changing the selection, which remains poised just after the stretch of “Figure Number” text, ready to do the next find.
n = 0
while true
  f.execute_find
  break if not f.found.get
   # memorize position of selection
  found_start, found_end = selection.selection_start.get, selection.selection_end.get
   # move forward
  past = selection.selection_end.get + 1
  active.select active.create_range(:start => past, :end_ => past)
   # insert figure number at memorized position
  active.create_range(:start => found_start, :end_ => found_end).content.set "Figure #{n += 1}"
end
This is a good first approximation, but the last line needs to be made a little more robust. We are substituting the figure number for the entire found stretch of “Figure Number” text; but we don’t want our substitution to stomp on any paragraph marks. This version shrinks the range we substitute into:
r = active.create_range(:start => found_start, :end_ => found_end).paragraphs[1].text_object
if r.content.get[-1,1] == "\r"
  r = active.create_range(:start => r.start_of_content.get, :end_ => r.end_of_content.get - 1)
end
r.content.set "Figure #{n += 1}"
The script now works. However, let’s not call it a day just yet. Our script has become verbose and difficult to read, mostly due to the rather elaborate procedures that are typically necessary in order to deal with Microsoft Word’s scriptability quirks and clumsy syntax. But — Ruby to the rescue! We can’t eliminate the quirks and the clumsiness, but we can largely conceal them by embodying them in a library, so that the code we actually have to write to carry out this particular task will be a lot more pleasant. For example, our library might look like this:
class MWord
  attr_reader :mw, :active, :selection, :f
  def initialize
    @mw = Appscript.app("Microsoft Word")
    @active = mw.active_document
    @selection = mw.selection
  end
  def range(st, en)
    active.create_range(:start => st, :end_ => en)
  end
  def select(st, en)
    active.select range(st, en)
  end
  def new_find(owner)
    @f = owner.find_object
    f.clear_formatting
    f.content.set ""
    f.forward.set true
    f.wrap.set :find_stop
    f.match_case.set false
    f.match_whole_word.set false
    f.match_wildcards.set false
    f.match_sounds_like.set false
    f.match_all_word_forms.set false
    f.format.set false
  end
  def find_successive
    while true
      f.execute_find
      break if not f.found.get
      found_start, found_end = selection.selection_start.get, selection.selection_end.get
      past = selection.selection_end.get + 1
      select(past, past)
      yield found_start, found_end
    end
  end
end
Our actual task of placing “Figure 1” and so forth at each successive stretch of “Figure Number” text would then look like this:
mw = MWord.new
 # go to top of document, prepare find
mw.select(0,0)
mw.new_find(mw.selection)
mw.f.format.set true
mw.f.style.set "Figure Number"
 # perform find, inserting "Figure n" at each found location
n = 0
mw.find_successive do |st, en|
  # determine range to write into, shrinking past final return character
  r = mw.range(st, en).paragraphs[1].text_object
  if r.content.get[-1,1] == "\r"
    r = mw.range(r.start_of_content.get, r.end_of_content.get - 1)
  end
  # write the caption
  r.content.set "Figure #{n += 1}"
end
That’s much more succinct, and, equally important, we’re now prepared to handle easily a variety of structurally similar tasks.
In this next example, we again have a lengthy Microsoft Word document, which is later to be exported as a PDF document. We want this PDF document to contain hyperlinks which, when clicked, jump to various header paragraphs (paragraphs whose style is “Heading 1”, “Heading 2”, and so on). But for various reasons we don’t want to use Word’s built-in cross-reference feature. Instead, while editing the document, we have marked each cross-referencing phrase in a character style, “Internal Reference,” where the content of each cross-referencing phrase is the same as the content of the heading we want to link to. Now we need a script that will walk through the document at the last minute, finding each “Internal Reference” stretch of text and hyperlinking it to the corresponding heading.
For example, we might have this phrase: “To learn how to set up up the overall workspace, read Dominate the Dock,” where “Dominate the Dock” is in the “Internal Reference” character style. Our goal is to find this stretch of text in the “Internal Reference” character style, discover that there is also a heading whose text is “Dominate the Dock,” and form a hyperlink from the former to the latter. We want to do that for every stretch of “Internal Reference” text.
This is quite an elaborate example, displaying a number of important techniques. In particular, it involves the creation of stuff. We are going to have to create hyperlinks (what Word calls a :hyperlink_object). What’s more, in order to create an internal hyperlink you have to have something to link it to, namely a bookmark (a :bookmark); so wherever a target “Heading” paragraph doesn’t already contain a bookmark, we’re going to have to create that too.
Our first task, though, before we can start worrying about object creation, or even before cycling through the “Internal Reference” texts, is to learn about all the “Heading” paragraphs — that is, the paragraphs whose style is “Heading 1,” “Heading 2,” and so on. These are the paragraphs which are candidates for being hyperlinked to, so we need to acquire a knowledge of where they are and what their content is, so that when we come to an “Internal Reference” text, we will know whether there is a corresponding “Heading” paragraph. We will gather this information beforehand, into a nice Ruby data structure, for rapid lookup. In other words, our script will proceed in two major phases: first, we’ll learn all about the “Heading” paragraphs; then, we’ll walk through the “Internal Reference” stretches and form our bookmarks.
You might think that we could obtain references to every “Heading” paragraph with a single boolean test element specifier, such as the following:
paras = mw.active.paragraphs[Appscript.its.style.begins_with("Heading")].get
Indeed, that works well enough for a very brief document; but you recall we stipulated that this document is lengthy. Not every scriptable application is well set up internally to handle complex element specifiers on a large document. A command such as this one sends Microsoft Word into La-La Land when the document is large; our Apple event times out, and I have no idea what timeout value would be needed in order to get an answer. We must therefore resort to more primitive means. I propose to cycle through the document three times, looking for “Heading 1” paragraphs, then “Heading 2” paragraphs, then “Heading 3” paragraphs, building a hash whose keys are the text of each heading and whose values are the position of that heading.
It might seem silly to cycle through the document three times, but it works, it doesn’t take all that long, and besides, thanks to the MWord class we developed in the previous example, it’s very easy:
mw = MWord.new # presupposes MWord class developed earlier
mw.mw.activate
h = Hash.new
(1..3).each do |n|
  mw.select(0,0)
  mw.new_find(mw.selection)
  mw.f.format.set true
  mw.f.style.set "Heading #{n}"
  mw.find_successive do |st, en|
    p = mw.range(st, en).paragraphs[1]
    h[p.text_object.content.get.chomp] = [st, en]
  end
end
We now have, in h, a hash like this:
{"Prepare to switch spaces"=>[122837, 122862], "Handle the Hierarchy"=>[46695, 46716], ... }
So much, then, for Phase One. Things are coming along splendidly. On to Phase Two. With our hash in hand, we will cycle through the document yet again, looking this time for stretches of “Internal Reference” text. Each time we find one, we will look up its content in our hash. If we find it (which we should, unless the document’s author has made a mistake), we will construct a hyperlink from the current selection (the “Internal Reference” stretch) to the location of the “Heading” paragraph as recorded in our hash.
An internal hyperlink, as I mentioned before, requires the existence of a bookmark to link to. So, our first move is to look to see whether a bookmark already exists within the target “Heading” paragraph. If it does, we obtain its name. If it doesn’t, we make one, assigning it a name. Then we make an internal hyperlink, linking to that bookmark (by means of its name).
It turns out, however, that the construction of a new bookmark’s name is far from trivial. Microsoft Word has all sorts of internal rules (undocumented, of course) for what constitutes a legal bookmark name. We will base our name on a lowercase version of the “Heading” paragraph’s text, with spaces and other non-alphabetical characters removed, and cut down to a length of 16 characters; to ensure uniqueness of each bookmark’s name, we will then append an “x” if that bookmark name is already in use. Here’s the routine to create the bookmark name:
def bookmarkify(s, mw)
  s = s.downcase.tr('^a-z', '')[0,16]
  s += "x" while mw.active.bookmarks[s].exists
  s
end
With that out of the way, we are ready for our first crack at the actual loop for dealing with each “Internal Reference” text. I’ll spare you an extended recital of the many tedious, frustrating hours of experimentation it took me to come up with this — especially how I discovered the details of the make commands required to create a new bookmark and a new hyperlink. The bookmark range, by the way, is arbitrarily set at the first three characters of the target “Heading” paragraph.
mw.select(0,0)
mw.new_find(mw.selection)
mw.f.format.set true
mw.f.style.set "Internal Reference"
mw.find_successive do |st, en|
  # examine Internal Reference stretch we just found
  ref_loc = mw.range(st, en)
  ref = ref_loc.content.get
  next if ref.length < 3 # sanity check
  # have a corresponding "Heading" paragraph?
  loc = h[ref]
  if loc
    bkmk_range = mw.range(loc[0], loc[0] + 3)
    bkmk = bkmk_range.bookmarks[1].name.get
    if bkmk == :missing_value # no bookmark there, create one
      bkmk = bookmarkify(ref, mw)
      mw.mw.make(:new => :bookmark, :at => mw.active, :with_properties =>
        {
          :name => bkmk,
          :start_of_bookmark => loc[0],
          :end_of_bookmark => loc[0] + 3
        }
      )
    end
    mw.mw.make(:new => :hyperlink_object, :at => mw.active, :with_properties =>
      {
        :text_to_display => ref,
        :hyperlink_address => '#' + bkmk,
        :text_object => ref_loc
      }
    )
  end
end
That, if I may say so myself, is brilliant. Observe that we are able to form both the new bookmark and the new hyperlink without causing the selection to change; thus, at the end of each pass through the loop, the selection is still right after the found “Internal Reference” text, ready for the next find. It all chugs away quite nicely, and when we’re done, the “Internal Reference” stretches have been turned into hyperlinks. All the hyperlinks work. Except for one thing. Most of the hyperlinks go to the wrong place. Instead of linking to the corresponding “Heading” paragraph, they link to a bookmark located elsewhere in the text.
What’s gone wrong? Well, we have recorded in our hash h the character positions of all the “Heading” paragraphs beforehand. We then start making hyperlinks. Each time we make one, we alter the text. The visible text may remain the same, but in fact we are creating hyperlink fields. Character position within the document is calculated with respect to the full length of a field’s formula, even if the document is displaying only the field’s value. Thus, each time we create a hyperlink, the character positions of all the “Heading” paragraphs after the newly created hyperlink have changed; but of course our hash h itself has not changed, so it now contains some wrong information. When we use that wrong information to place further bookmarks, they are naturally in the wrong place.
We’re going to have to compensate by changing h each time we create a hyperlink. This sounds daunting but in fact it’s quite simple. Every time we create a hyperlink, we will calculate the resulting change in the length of the document. We will then adjust, by that difference, all the location values in the hash representing positions after the newly created hyperlink (the locations before the hyperlink are unaffected).
As we make the hyperlink, we are handed a reference to the newly created hyperlink:
    link = mw.mw.make(:new => :hyperlink_object, :at => mw.active, :with_properties =>
    ...
It is easy, then, to calculate the adjustment and impose it on all the relevant location values in the hash. The end of the script now looks like this:
    link = mw.mw.make(:new => :hyperlink_object, :at => mw.active, :with_properties =>
      {
        :text_to_display => ref,
        :hyperlink_address => '#' + bkmk,
        :text_object => ref_loc
      }
    )
    new_length = link.text_object.end_of_content.get - link.text_object.start_of_content.get
    adjustment = new_length - (en - st)
    h.values.find_all {|val| val[0] > en}.each {|val| val[0] += adjustment; val[1] += adjustment}
  end
end
On my machine, that script, operating on a 150-page Take Control manuscript, runs in less than a minute. (Well, it runs in less than a minute if I waggle the mouse the entire time the script is running. Did I mention that Microsoft Word is quirky?) In real life we would probably instrument the script with plenty of output messages, keeping the user apprised of its progress.
Microsoft Excel is a spreadsheet application that fairly stands alone in its field, being widely used by both individuals and businesses. It is heavily scriptable, but like Microsoft Word its scriptability API has a weird verbosity that reveals its Visual Basic origins, as well as a pervasive bugginess that is unhappily typical of Microsoft. My examples are tested with Excel 2004; I do not know whether Excel 2008 improves matters.
This example stems from an actual task I was called upon to perform for TidBITS. When we moved our article archives into HTML format and implemented a search engine, we needed to know the words most commonly used by articles, so as to decide what terms to use as “stop words” (terms that the search engine won’t bother looking for, because they are likely to result in hits in virtually every article in the database).
I wrote a program to generate a word histogram for each article; it then occurred to me that the results would be clearer and more dramatic if they were graphed. Excel has quite decent basic graphing capabilities. So this script takes a text file, generates a histogram, feeds the data about the most common words to Excel, and then asks Excel to graph that data. (If this example sounds familiar, it should be; I used it in my AppleScript book, and again in my online article about rb-appscript.)
We already know how to make a histogram in Ruby (see Chapter 2), so the first part of the script is easy. We ask the user for a text file; we read the text file and generate the histogram.
excel = Appscript.app("Microsoft Excel")
excel.activate
sa = OSAX.osax(nil, "Microsoft Excel") # need to require 'osax' first
f = sa.choose_file(:with_prompt => "Pick a text file...", :of_type => "public.text") rescue exit
s = File.read(f.path)
h = {} # empty hash
s.split(/\W+/).each do |item|
  item = item.downcase
  h[item] = (h[item] || 0) + 1
end
Now we’ll sort the histogram information and reduce it to the 30 most frequently used words. We’ll make a new Excel worksheet and pop the histogram information into it, and select that data.
wds = h.sort {|x,y| x[1] <=> y[1]} [-30..-1]
excel.make :new => :document
excel.active_sheet.ranges["A1:B30"].value.set wds
excel.ranges["A1:B30"].select
Finally, we create the chart based on the selection, and after that the entire script is a rather tedious matter of setting the chart’s properties to make it look nice. The nested each do loops are merely a convenient way of iterating through every possible axis of the chart (because Excel doesn’t let us ask for all of them at once); some of the resulting six axes will rebel when we try to set their has_major_gridlines property, but I am too lazy to worry about which ones these are, so I handle any resulting exceptions by ignoring them.
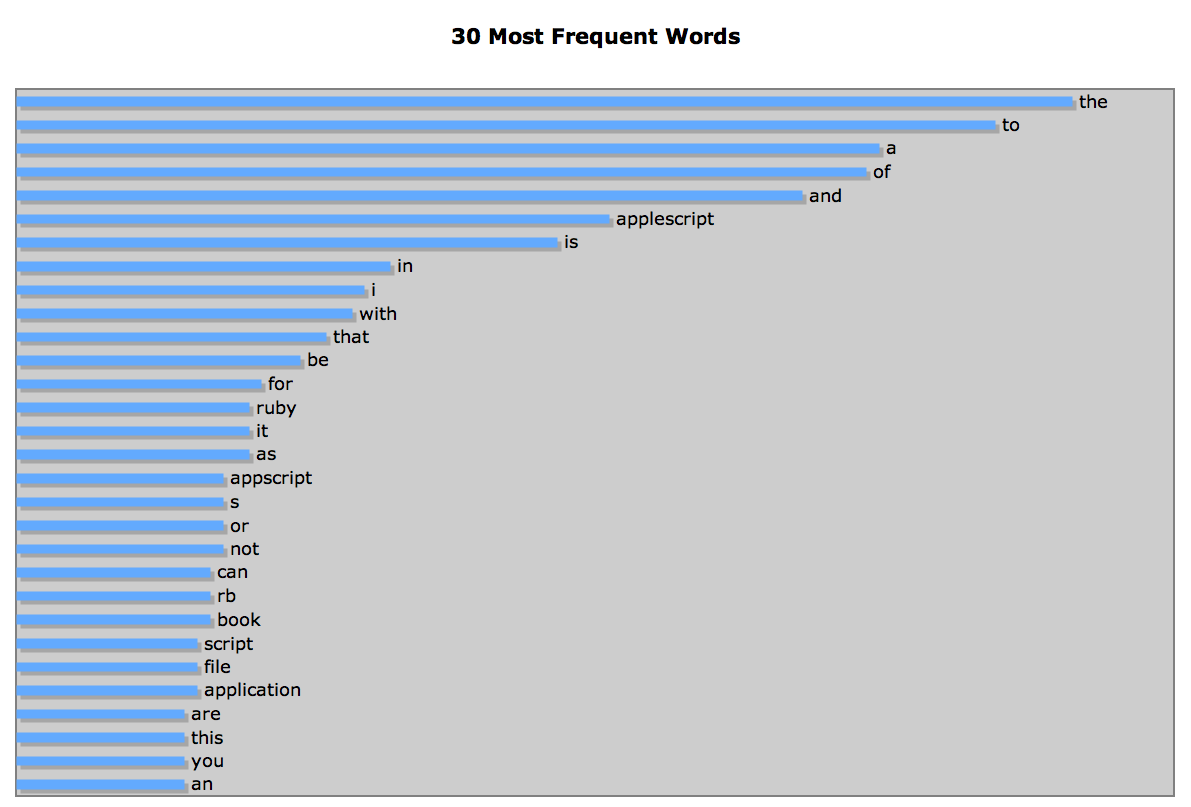
excel.make(:new => :chart_sheet, :at => excel.active_workbook)
c = excel.active_chart
c.chart_type.set(:bar_clustered)
c.has_title.set(true)
c.chart_title.caption.set("30 Most Frequent Words")
c.has_legend.set(false)
c.apply_data_labels(:type_ => :data_labels_show_label, :legend_key => false)
[:category_axis, :series_axis, :value_axis].each do |axt|
  [:primary_axis, :secondary_axis].each do |ax|
    begin
      x = c.get_axis(:axis_type => axt, :which_axis => ax)
      x.has_major_gridlines.set(false)
      x.has_minor_gridlines.set(false)
      x.has_title.set(false)
      c.set_has_axis(:axis_type => axt, :axis_group => ax, :axis_exists => false)
    rescue
    end
  end
end
Figure 10–1 is a screen shot of the output when the script was run against an early draft of the introduction to this book:
Figure 10–1
When the folks in charge of the Mac version of Microsoft Office prepared the road map for the transition from Office 2004 to Office 2008, they eliminated Visual Basic for Applications. In many cases, the scriptability of the Office applications through AppleScript can make up for this; but Excel user-defined functions present a special difficulty. To see what I mean, you have to know what a user-defined function is. The best way for me to explain user-defined functions is to show you an example where such a function would be used.
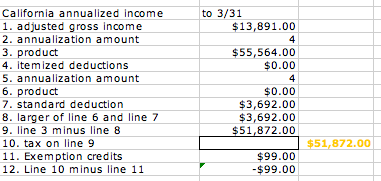
Figure 10–2
Figure 10–2, taken from a tax-calculation spreadsheet, has a hole in it. In the empty cell with a solid outline border, we need to provide the calculated tax on the amount in the cell above it. In earlier versions of Excel, a simple way to do this was to place a formula in that cell:
=calTaxRateSchedule(B34)
This formula calls the calTaxRateSchedule function. Excel doesn’t define any such built-in function. Rather, the user has defined it as part of the spreadsheet, using Visual Basic:
Function calTaxRateSchedule(x As Single)
    If x <= 7168 Then
        calTaxRateSchedule = 0.01 * x
    ElseIf x <= 16994 Then
        calTaxRateSchedule = 71.68 + 0.02 * (x - 7168)
     ElseIf x <= 26821 Then
        calTaxRateSchedule = 268.2 + 0.04 * (x - 26821)
    ElseIf x <= 37233 Then
        calTaxRateSchedule = 661.28 + 0.06 * (x - 22306)
    ElseIf x <= 47055 Then
        calTaxRateSchedule = 1286 + 0.08 * (x - 37233)
    Else
        calTaxRateSchedule = 2071.76 + 0.093 * (x - 47055)
    End If
End Function
That’s a complicated calculation, but because it’s defined as a function, it is magically called by the formula in that cell, and the result is displayed as the value of the cell. But in Excel 2008, Visual Basic doesn’t exist. A user-defined function is therefore impossible. The Microsoft people, when they removed Visual Basic, might have tackled this problem in some other way; for example, they could have made a provision for writing a user-defined function in some other language, such as AppleScript. But they didn’t. Basically, they just ignored the whole problem, essentially breaking the spreadsheets of every user who employs user-defined functions.
So how are we to fill in this value, which requires this complicated calculation? Various workarounds are possible, none of them terribly pleasant or efficient. This example demonstrates one such workaround.
Our workaround is to run a script against the worksheet as a whole, filling in the missing number. This is a pretty terrible workaround, because the value in the outlined cell is no longer “live”; we have to remember to run the script every time the spreadsheet changes. Still, it’s better than nothing (which is what Microsoft has left us with).
The script relies on the placement of a marker in the spreadsheet. You see how, to the right of the empty cell with the solid outline border, there’s a sort of orange number? That number is orange because it’s in a cell that has been assigned a style, called “marker”. I propose to find every cell with the “marker” style, grab its value, pass it through the complicated calculation, and enter the result in the cell to its left.
We begin by defining the complicated calculation:
def caltaxrate(x)
  if x <= 7168
    0.01 * x
  elsif x <= 16994
    71.68 + 0.02 * (x - 7168)
  elsif x <= 26821
    268.2 + 0.04 * (x - 26821)
  elsif x <= 37233
    661.28 + 0.06 * (x - 22306)
  elsif x <= 47055
    1286 + 0.08 * (x - 37233)
  else
    2071.76 + 0.093 * (x - 47055)
  end
end
Next we talk to Excel. You might think we could use a boolean test element specifier to ask for every cell whose style is called “marker”, but my experience of trying that is that it mostly just causes Excel to crash. So we’re going to have to resort to more primitive means: we’re going to examine every cell of every sheet of the active workbook and look to see if its style is called “marker”. This is tremendously profligate of Apple events, but there seems to be no alternative. We can reduce the number of cells to be examined by looking only at the used_range of each sheet, but within that range we must still query each cell individually. Here’s the loop:
excel = Appscript.app("Microsoft Excel")
excel.active_workbook.sheets.get.each do |sheet|
  used = sheet.used_range
  (1..used.count(:each => :cell)).each do |ix|
    cell = used.cells[ix]
    if cell.style_object.name.get == "marker"
What shall we do when we find a cell whose style is “marker”? We’d like to fetch its value. But there’s a problem. (There always is.) It turns out that if a numeric cell has had a format applied to it, as this one has (that’s why it appears with a dollar-sign and two decimal places), the value of that cell is returned as :missing_value. To work around this, we’ll retain the numeric format, remove the numeric format, fetch the value, and restore the numeric format.
      format = cell.number_format.get
      cell.number_format.set ""
      value = cell.value.get
      cell.number_format.set format
The hard part is now over. We move left one column, set the value of that cell to the calculated value, and we’re done.
      left = cell.get_offset :column_offset => -1
      left.value.set caltaxrate(value)
    end
  end
end
The scriptability of Adobe InDesign is the backbone of many professional publishing workflows. InDesign is extraordinarily scriptable; it is probably fair to suggest that there’s nothing you can do manually in InDesign that you can’t do by scripting. InDesign’s scripting API is available not only through Apple events but also through Visual Basic and JavaScript. You’ll want to download the scriptability resources from Adobe’s Web site (http://www.adobe.com/products/indesign/scripting/).
The InDesign object model is massive, and its dictionary is heavy with commands. Thus far, it sounds rather like Microsoft Word, whose scripting API is likewise influenced by its Visual Basic ancestry. But unlike Microsoft, Adobe has a long-standing reputation for the power, efficiency, flexibility, and reliability of its core scriptability engine. The InDesign object model takes some getting used to, but once you get the hang of it, it feels natural and satisfying. More important, it works the way it’s supposed to. For example, in an earlier section we had to resort to a repeated find because Microsoft Word hangs when a long document is presented with a simple boolean test element specifier:
paras = mw.active.paragraphs[Appscript.its.style.begins_with("Heading")].get # hangs
But the very same sort of element specifier on a document of comparable length in InDesign is instantly resolved (observe that text must be accessed through a story or a text frame):
ind = Appscript.app("Adobe InDesign CS4")
p ind.active_document.stories[2].paragraphs[
  Appscript.its.applied_paragraph_style.name.begins_with("h")].index.get
#=> [1, 3549, 5616, 9367, ... ]
Objects such as rectangles and text frames can actually have names that can be used in element specifiers; what’s more, you can view and assign these names directly in the user interface. To do so, choose Window > Automation > Script Label; this brings up a floating window that accesses the name of the currently selected object. Technically, this name is the object’s label property (not its name property), but you can use it in a name element specifier, as this artificial example demonstrates:
ind = Appscript.app("Adobe InDesign CS4")
label = ind.active_document.pages[2].text_frames[1].label.get
ind.active_document.pages[2].text_frames[label].geometric_bounds.get
InDesign’s behavior when running a script is governed through its script_preferences property. A commonly used technique ensures that dialogs don’t interrupt a script, such as the alerts warning of missing fonts or links that need updating:
ind = Appscript.app("Adobe InDesign CS4")
ind.script_preferences.user_interaction_level.set :never_interact
If you do this, you might like to make sure that your script, no matter how it terminates, first resets this value (to :interact_with_all). Otherwise, the user will never see any of the disabled alerts or dialogs. Quitting InDesign also resets it.
Suppose we wish to automate the construction of pages of a catalog. As a simplified first step, I’ll subdivide the master page into an imaginary grid, and create rectangle objects on that grid. For simplicity, assume that this document has just one master spread and that it is a single page (that is, we do not have to contend with facing odd-even pages). First, let’s get a reference to the master page.
ind = Appscript.app("Adobe InDesign CS4")
active = ind.active_document
page = active.master_spreads[1].pages[1]
A page has bounds, describing its rectangular shape in the rather odd format [y1, x1, y2, x2]. But this is the shape of the entire page; we want to stay within the margins. The margins are expressed as properties of the page’s margin_preferences property. So we fetch the margin values and calculate a smaller rectangle, inset from the bounds by the margin values. This is a good moment to use the properties_ property (see Chapter 7), which lets us use a single Apple event to obtain all four margin values in a hash.
 # get margin boundaries
b = page.bounds.get # [y1, x1, y2, x2]
margins = page.margin_preferences.properties_.get
m = [margins[:top], margins[:left], margins[:bottom], margins[:right]]
bb = [b[0] + m[0], b[1] + m[1], b[2] - m[2], b[3] - m[3]]
Now we calculate our grid. I’ve hard-coded the number of rectangles per row and per column, along with the horizontal and vertical gutters that are to lie between them; in real life we might have some more flexible way of providing these values. From these values, we derive w and h, the width and height that each rectangle will need to have.
 # subdivide horizontally
xgutter = 1.5 # NB in real life we might not hard-code this
xct = 4 # NB in real life we might not hard-code this
w = (bb[3] - bb[1] - (xct-1) * xgutter) / xct
 # subdivide vertically
ygutter = 1.5 # NB in real life we might not hard-code this
yct = 3 # NB in real life we might not hard-code this
h = (bb[2] - bb[0] - (yct-1) * ygutter) / yct
We are now ready to create our rectangles! This is a simple and obvious nest of loops, as we give each rectangle the previously calculated width and height, spacing them out according to the gutter values. Notice that we are careful about the order and that we attach a label to each rectangle, so that we can populate the rectangles in the correct order on each page later on. The stroke applied to each new rectangle is merely a way of displaying the rectangle’s boundary, so that we can see that our script actually does something; in real life, once the script is working, we might well omit it.
 # lay out rectangles
label = 0
y = bb[0]
(1..yct).each do
  x = bb[1]
  (1..xct).each do
    ind.make(:new => :rectangle, :at => page, :with_properties =>
      {
        :geometric_bounds => [y, x, y + h, x + w],
        :stroke_weight => 1,
        :stroke_color => "Black",
        :label => "r#{label += 1}"
      }
    )
    x += w + xgutter
  end
  y += h + ygutter
end
Continuing from the previous example, we now have a master page containing rectangles with labels “r1”, “r2” and so on. Using actual document pages, we will proceed to cycle through all the files in a folder full of images and place each file in a successive rectangle.
How would you do this for one image in real life? You’d probably choose File > Place, select the desired image file in the Place dialog, and then click within the rectangle. Since the rectangle is really in the master page, not in the document page, InDesign implicitly performs an override of it, effectively copying it from the master page to the document page. We will have to perform this override explicitly in our script.
We begin by initializing some variables: f is the folder containing the image files, n is a counting variable that will be used to form the strings "r1", "r2" and so on, and doc_page is a page of the document that uses our master page. For simplicity, I assume we are following straight on from the previous example, so that active is still the active document, and page is still a reference to the master page of the active document where we created the rectangles earlier. Notice the use of InDesign’s parent property, which lets you work your way up the containment hierarchy.
f = Pathname.new(ENV["HOME"]) + "Desktop/pix"
n = 0
doc_page = active.pages[Appscript.its.applied_master.id_.eq(page.parent.id_)].last.get
Now we start our loop. I like to use the Pathname class for file manipulation (you might have to require 'pathname' to load it); it makes looping through a folder very simple. Our first move is to reject files whose name starts with a period; this is mostly because of those annoying “.DS_Store” files that the Mac OS X Finder likes to dump everywhere. For simplicity, we assume the other files really are image files, with no further error checking.
f.children.each do |pic|
  next if pic.basename.to_s =~ /^\./
  r = "r#{n += 1}"
  begin
    rect = ind.override page.rectangles[r], :destination_page => doc_page
We calculate the label name, and perform our override. You’ll notice that I’ve wrapped the override line in a begin clause. That’s because I’m going to take advantage of Ruby’s error-handling capabilities to perform a slick trick. We must worry about what will happen if there are more image files in our folder than there are rectangles on the master page. If so, then if we don’t watch out, we will attempt to override some non-existent rectangle, such as rectangles["r13"], and InDesign will raise an exception. My solution is not to watch out, but rather to let the exception happen, catch it, make a new document page, and restart the label numbering.
  rescue
    doc_page = ind.make :new => :page, :at => active, :with_properties =>
      {
        :applied_master => page.parent
      }
    n = 0
    redo
(Properly speaking I should probably be checking to make sure that the exception being caught is the exception I expect.) As I make the new document page, I tell it to use the correct master page. Finally, with a flourish I call upon Ruby’s redo keyword to restart this iteration of the loop, so that we are still processing the same file.
Finally, we come to what happens when there is no error in the override line. We place our file into the rectangle created on the document page by the override, and adjust its “fit” options so that it is fully displayed and centered.
  else
    ind.place MacTypes::Alias.path(pic.to_s), :on => rect
    ind.fit rect, :given => :proportionally
    ind.fit rect, :given => :center_content
  end
end
This example is a variant on the previous two. Instead of dynamically creating rectangles in the master page and populating them on the document pages with pictures, we will dynamically create text frames and populate them with text. Let’s start by assuming that our text, consisting of image captions, is stored in some sort of database-like structure. This could, of course, actually be a database, in which case Ruby could probe it with Sequel or ActiveRecord or whatever library we prefer; in this case, though, let’s use XML, which is after all a kind of lightweight database. Our captions, then, are in an XML file with the following structure:
<?xml version="1.0" encoding="UTF-8"?>
<root>
    <caption>
        Sunset in the hills above an Ojai orchard.
    </caption>
    <caption>
        A gull nesting among the coreopsis on Anacapa Island.
    </caption>
    ...
</root>
We’ll start by parsing this XML file and extracting the captions into an array, using REXML:
require 'rexml/document'
captions = Array.new
f = Pathname.new(ENV["HOME"]) + "Desktop/pix.xml"
doc = REXML::Document.new f.read
doc.elements.each("root/caption") {|elem| captions << elem.text.strip}
Our code for laying out the grid of text frames will be exactly the same as the code for laying out rectangles, except for this line:
ind.make(:new => :rectangle, :at => page, :with_properties =>
Instead, we’ll say this:
ind.make(:new => :text_frame, :at => page, :with_properties =>
The code for placing text in the text frames is almost exactly like the code for placing images in the rectangles. A text frame has a contents property, and we simply set it to the desired text.
n = 0
doc_page = active.pages[Appscript.its.applied_master.id_.eq(page.parent.id_)].last.get
captions.each do |s|
  r = "r#{n += 1}"
  begin
    tf = ind.override page.text_frames[r], :destination_page => doc_page
  rescue
    doc_page = ind.make :new => :page, :at => active, :with_properties =>
      {
        :applied_master => page.parent
      }
      n = 0
    redo
  else
    tf.contents.set s
  end
end
In the earlier examples, I laid out a grid of rectangles, and commented that in real life, the parameters of this grid might not be hard-coded into the script:
 # subdivide horizontally
xgutter = 1.5 # NB in real life we might not hard-code this
xct = 4 # NB in real life we might not hard-code this
w = (bb[3] - bb[1] - (xct-1) * xgutter) / xct
 # subdivide vertically
ygutter = 1.5 # NB in real life we might not hard-code this
yct = 3 # NB in real life we might not hard-code this
h = (bb[2] - bb[0] - (yct-1) * ygutter) / yct
How else might the parameters be supplied? Well, we might ask the user. InDesign lets us create and display custom interface on the fly. Let’s modify the example so that we ask the user for the values of xgutter, xct, ygutter, and yct. The following typifies the task of dialog creation and display:
d = ind.make :new => :dialog
d.name.set "Grid Parameters"
col = ind.make :new => :dialog_column, :at => d
h = Hash.new
[
  ["X Gutter:", :real_editbox, "1.5", :xgutter],
  ["X Count:", :integer_editbox, "4", :xct],
  ["Y Gutter:", :real_editbox, "1.5", :ygutter],
  ["Y Count:", :integer_editbox, "3", :yct]
].each do |item|
  row = ind.make :new => :dialog_row, :at => col
  c = ind.make :new => :dialog_column, :at => row
  ind.make :new => :static_text, :at => c,
    :with_properties => {:static_label => item[0]}
  c = ind.make :new => :dialog_column, :at => row
  h[item[3]] = ind.make :new => item[1], :at => c,
    :with_properties => {:edit_contents => item[2]}
end

ind.activate
res = ind.show(d) # boolean, for OK or Cancel
if res
  h.each {|k,v| h[k] = v.edit_value.get}
end
ind.destroy d
exit unless res
The only element of a :dialog is a :dialog_column, so you will always start by creating a new :dialog_column within your new :dialog to give yourself a place to put the other interface objects, which you then proceed to create. InDesign lays out the interface objects for you, vertically within each :dialog_column, so to impose a little more control over the layout you can use combinations of additional :dialog_row and :dialog_column objects (and :border_panel objects, not used here). We are making four of the same basic thing — a static text labeling an editbox — so we set up the parameters in advance as an array and loop through the array.
When we’re done with the loop, references to the editbox objects are stored in our hash h. This is important, because it is through these references that we’re going to obtain the value of each editbox object after the user has interacted with the dialog. Now we display the dialog (Figure 10–3), fetch the values of the editbox objects, and destroy the dialog. The result of the show command tells us whether the user clicked “OK” or “Cancel”; we should respond appropriately. Here, we simply exit the script if the user cancels. If the user clicks “OK,” we have retained the values of the editbox objects in our hash h, and can proceed to create the grid as in the earlier example.
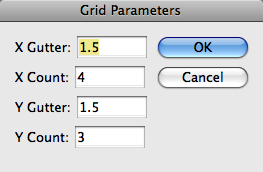
Figure 10–3
JavaScript scripting (available through the do script command) allows access to the ScriptUI scripting component, which permits the creation and management of more complex dialogs if you need them.
InDesign is very forgiving about object creation. Unlike Microsoft Word, which requires you to guess repeatedly at the correct make incantation with just the right :with_properties parameters in order to create an object (with crashing a real possibility if you get it wrong), InDesign generally lets you create the object first and assign it properties afterwards.
So, for instance, let’s say we want to create a new document with a custom size and without facing pages. In the user interface, InDesign lets us specify all that in advance, in the New Document dialog. But in scripting, we don’t have to specify those parameters in advance; we can create the document and then adjust its parameters.
ind = Appscript.app("Adobe InDesign CS4")
d = ind.make :new => :document
dp = d.document_preferences
dp.page_width.set "800pt"
dp.page_height.set "600pt"
dp.facing_pages.set false
d.delete d.master_spreads[1].pages[2]
Similarly, we can create a new paragraph style and adjust its parameters:
d = ind.active_document
s = ind.make :new => :paragraph_style, :at => d
s.name.set "caption"
s.applied_font.set ind.fonts["Futura\tMedium"]
s.justification.set :center_align
s.left_indent.set "0p3"
s.right_indent.set "0p3"
s.hyphenation.set false
s.balance_ragged_lines.set true
The only trick in that code is that the name of the font has a tab character between its family and its style.
You have probably guessed already what all of this is leading up to. I will combine all of the preceding InDesign scripts into a single grand script that creates an InDesign document completely from scratch and populates it with a grid of images and captions as directed by an XML document, using grid parameters supplied by the user.
The XML file now has this format, consisting of caption / image file path pairs:
<?xml version="1.0" encoding="UTF-8"?>
<root>
    <picture>
        <caption>
            Sunset in the hills above an Ojai orchard.
        </caption>
        <path>
            /Users/mattleopard/Desktop/pix/ana019.JPG
        </path>
    </picture>
    <picture>
        <caption>
            A gull nesting among the coreopsis on Anacapa Island.
        </caption>
        <path>
            /Users/mattleopard/Desktop/pix/ana015.JPG
        </path>
    </picture>
    ...
</root>
Here’s the script, which pulls together a great deal of what has been discussed in this book. First we load the needed libraries and bring InDesign frontmost.
require 'appscript'
require 'osax'
require 'rexml/document'

ind = Appscript.app("Adobe InDesign CS4")
ind.activate
Using the scripting addition command choose_file we present a dialog where the user can specify the XML file containing the caption / image file path pairs.
 # ask user for xml document
sa = OSAX.osax.by_name("Adobe InDesign CS4")
begin
  f = sa.choose_file :with_prompt => "Choose the XML file containing paths and captions:",
    :of_type => ["public.plain-text", "public.xml"],
    :default_location => sa.path_to(:desktop)
rescue
  exit # in case user cancels
end
We parse the XML document, storing the captions in a captions array and the image file paths in a paths array.
 # parse xml document
captions = Array.new
paths = Array.new
doc = REXML::Document.new Pathname(f.path).read
doc.elements.each("root/picture/caption") {|elem| captions << elem.text.strip}
doc.elements.each("root/picture/path") {|elem| paths << elem.text.strip}
We now present the user with a custom dialog asking for the grid parameters. To the four parameters in the earlier example, we have added a fifth, the height of the caption. The user’s settings are saved as the grid_params hash.
 # ask user for grid parameters
d = ind.make :new => :dialog
d.name.set "Grid Parameters"
col = ind.make :new => :dialog_column, :at => d
grid_params = Hash.new
[
  ["X Gutter:", :real_editbox, "1.5", :xgutter],
  ["X Count:", :integer_editbox, "4", :xct],
  ["Y Gutter:", :real_editbox, "1.5", :ygutter],
  ["Y Count:", :integer_editbox, "3", :yct],
  ["Caption Height:", :real_editbox, "2", :tfh]
].each do |item|
  row = ind.make :new => :dialog_row, :at => col
  c = ind.make :new => :dialog_column, :at => row
  ind.make :new => :static_text, :at => c,
    :with_properties => {:static_label => item[0]}
  c = ind.make :new => :dialog_column, :at => row
  grid_params[item[3]] = ind.make :new => item[1], :at => c,
    :with_properties => {:edit_contents => item[2]}
end
res = ind.show(d) # boolean, for OK or Cancel
if res
  grid_params.each {|k,v| grid_params[k] = v.edit_value.get}
end
ind.destroy d
exit unless res # in case user cancels
We create the document, retaining a reference to it as d. The line where we set the document’s smart_text_reflow preference to false is new, and it’s crucial. If InDesign’s global preferences have Smart Text Reflow turned on, then when we insert a caption into a text frame, if that caption overflows the text frame, an extra page will be generated automatically and the caption story will be made to flow into a text frame on that page. We don’t want that to happen. A caption might be too big for its text frame, but we’ll take care of that later by reducing the size of the caption’s text.
 # create document
d = ind.make :new => :document
dp = d.document_preferences
dp.page_width.set "800pt"
dp.page_height.set "600pt"
dp.facing_pages.set false
d.delete d.master_spreads[1].pages[2]
d.text_preferences.smart_text_reflow.set false # NB
We create the “caption” paragraph style, exactly as in the earlier example.
 # create caption style
s = ind.make :new => :paragraph_style, :at => d
s.name.set "caption"
s.applied_font.set ind.fonts["Futura\tMedium"]
s.justification.set :center_align
s.left_indent.set "0p3"
s.right_indent.set "0p3"
s.hyphenation.set false
s.balance_ragged_lines.set true
We lay out the grid of rectangles and text frames on the master page (page), using the parameters from the grid_params hash. We have commented out the lines assigning each rectangle and text frame a stroke. Every slot of the grid is now to be occupied by a rectangle above and a text frame below. So each complete slot on the grid is specified by x and y, w and h, but when placing a rectangle we reduce the height by the text frame height (tfh), and when placing a text frame we place its top exactly at the bottom of its corresponding rectangle. There is a chance that an image will fill its rectangle’s height, in which case the first line of the caption’s text will be too close to the image; to prevent this, we introduce some white space between them by setting the text frame’s inset_spacing.
 # lay out grid on master page
 # get margin boundaries
page = d.master_spreads[1].pages[1]
b = page.bounds.get # [y1, x1, y2, x2]
margins = page.margin_preferences.properties_.get
m = [margins[:top], margins[:left], margins[:bottom], margins[:right]]
bb = [b[0] + m[0], b[1] + m[1], b[2] - m[2], b[3] - m[3]]
 # subdivide horizontally
xgutter = grid_params[:xgutter]
xct = grid_params[:xct]
w = (bb[3] - bb[1] - (xct-1) * xgutter) / xct
 # subdivide vertically
ygutter = grid_params[:ygutter]
yct = grid_params[:yct]
h = (bb[2] - bb[0] - (yct-1) * ygutter) / yct
 # lay out rectangles and text frames
tfh = grid_params[:tfh]
label = 0
y = bb[0]
(1..yct).each do
  x = bb[1]
  (1..xct).each do
    ind.make(:new => :rectangle, :at => page, :with_properties =>
      {
        :geometric_bounds => [y, x, y + h - tfh, x + w],
        # :stroke_weight => 1, # uncomment during development
        # :stroke_color => "Black", # uncomment during development
        :label => "r#{label += 1}"
      }
    )
    tf = ind.make(:new => :text_frame, :at => page, :with_properties =>
      {
        :geometric_bounds => [y + h - tfh, x, y + h, x + w],
        # :stroke_weight => 1, # uncomment during development
        # :stroke_color => "Black", # uncomment during development
        :label => "r#{label}"
      }
    )
    tf.text_frame_preferences.inset_spacing.set [0.25, 0, 0, 0] # gap the top
    x += w + xgutter
  end
  y += h + ygutter
end
We get a reference to the last document page that uses our master page (doc_page) and proceed through the lists of paths and captions, placing each image into a rectangle and inserting each caption into the corresponding text frame. This is simply a straightforward combination of the earlier scripts, except that now, when we have inserted a caption into a text frame, we also assign it the “caption” paragraph style.
 # place pictures and captions into overrides
n = 0
doc_page = d.pages[Appscript.its.applied_master.id_.eq(page.parent.id_)].last.get
paths.zip(captions).each do |pic, caption|
  r = "r#{n += 1}"
  begin
    rect = ind.override page.rectangles[r], :destination_page => doc_page
  rescue
    doc_page = ind.make :new => :page, :at => d, :with_properties =>
      {
        :applied_master => page.parent
      }
    n = 0
    redo
  else
    ind.place MacTypes::Alias.path(pic), :on => rect
    ind.fit rect, :given => :proportionally
    ind.fit rect, :given => :center_content
    tf = ind.override page.text_frames[r], :destination_page => doc_page
    tf.contents.set caption
    tf.paragraphs.applied_paragraph_style.set "caption"
  end
end
The final step — and, I think, the coolest — is to reduce the point_size of the “caption” paragraph style repeatedly by a small amount, thus reducing the text size of all the captions simultaneously, until all the captions fit completely into their text frames. We can test for this condition with a single Apple event, asking how many text frames have an overflows property value of true; when the answer is zero, or when the test itself generates an error, we’re done.
 # reduce caption font size until no text frame overflows
ptsz = d.paragraph_styles["caption"].point_size.get
begin
  while ind.active_document.text_frames[Appscript.its.overflows.eq(true)].count(:each => :item) > 0
    d.paragraph_styles["caption"].point_size.set(ptsz -= 0.5)
  end
rescue
end
Figure 10–4 is a sample page of the document generated by a typical run of our script.
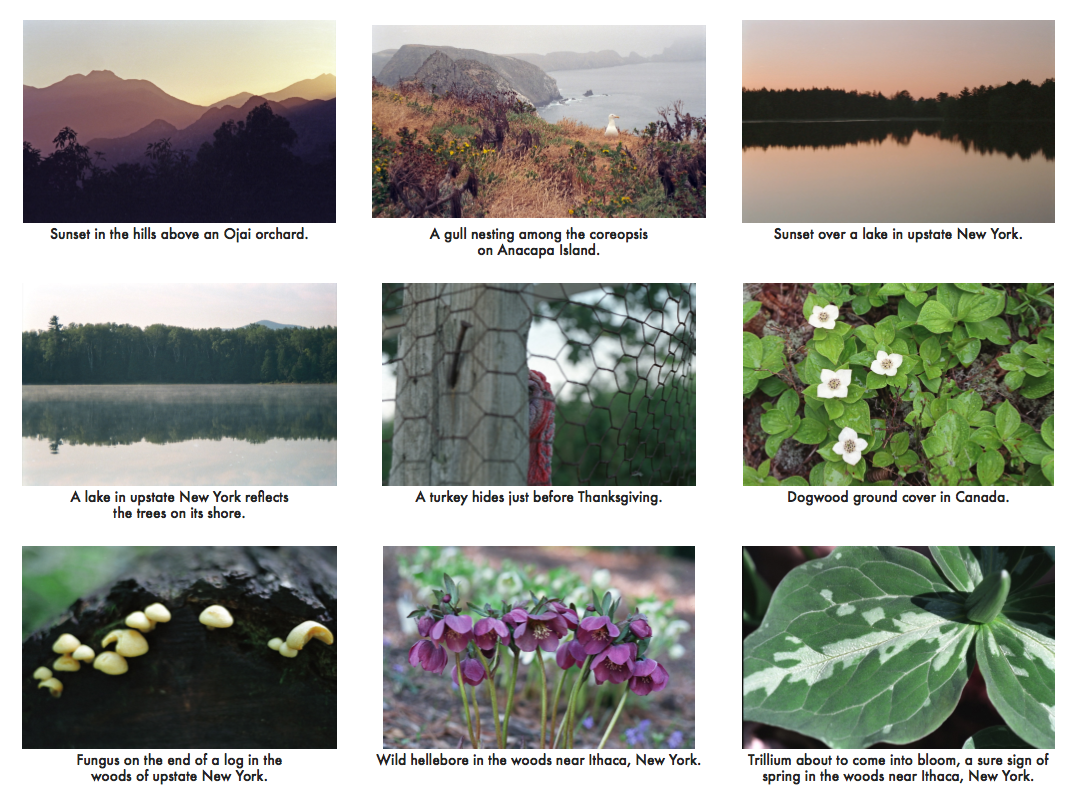
Figure 10–4
You’re looking at a draft of a chapter from a work in progress, tentatively titled Scripting Mac Applications With Ruby: An AppleScript Alternative, by Matt Neuburg.
Covers rb-appscript 0.6.1. Last revised Jun 23, 2012. All content ©2012 by the author, all rights reserved.
This book took time and effort to write, and no traditional publisher would accept it. If it has been useful to you, please consider a small donation to my PayPal account (matt at tidbits dot com). Thanks!