Virtualizing Snow Leopard Server on Mavericks
January 25, 2014 at 07:37:45
Snow Leopard (Mac OS X 10.6) was the last Mac system I really liked; I detested Lion (10.7), but could live with Mountain Lion (10.8) long enough to use it temporarily when necessary — as when writing my books, where I needed to be using the latest version of Xcode. This situation I managed by maintaining an internal hard disk with two partitions, one with Snow Leopard installed, the other with Mountain Lion. By rebooting, I could switch systems.
But this situation could not endure forever. The computer was never entirely happy with it; booting into the Snow Leopard partition, for example, tended to damage the Spotlight index on the Mountain Lion partition, and vice versa. Much more significant, one day the Mountain Lion partition was damaged and had to be erased — at which point I installed Mavericks (10.9) on it — and this got me thinking: my computer is four years old, and if I buy a new one, it won’t run Snow Leopard at all.
I therefore decided to experiment with virtualizing Snow Leopard. The idea is that if I can get Snow Leopard installed and running as a virtual machine now, on a computer where installation of Snow Leopard is still permitted, then in the future, on some other computer, that virtual machine might continue working.
I’m going to describe, as best I can remember them (from yesterday), the steps by which I seem (so far) to have succeeded in doing this, virtualizing Snow Leopard Server under Mavericks using the freeware Virtual Box. My approach may not be optimal or even very correct, but it seems to have worked.
-
Obtain a Mac OS X Server install disc for Snow Leopard Server (10.6.3). The reason is that virtualizing Snow Leopard nonserver is illegal, and there is little reason to yank Apple’s chain. The disc can be obtained for about $25 by phoning the Apple Store, or (for slightly more money) from eBay and similar sources.
-
Download a copy of Virtual Box.
-
We are going to create a virtual machine that emulates a Mac. This Mac will initially be completely empty; its internal hard disk isn’t even going to be formatted, so it obviously can’t boot from the internal disk. So we need to get this Mac to do what a real Mac can do, namely, as it boots, to see the install disc and boot from it.
I had a very hard time with this step. The instructions, and various comments on the net, seemed to imply that I could rip the server disk to a file (such as, perhaps, a .dmg) and Virtual Box’s emulated Mac would treat this as bootable. However, I never got that to work. Here’s what did work: I told Virtual Box’s emulated Mac to boot from the actual install disc (the same thing that would happen if you booted your empty Mac while holding down the C key).
So, the install disc is sitting in the computer’s CD slot. We make a new virtual machine. I accepted all the defaults; Snow Leopard Server wasn’t listed so I just chose generic Mac OS X. Now I configured the Settings for the machine; in particular, for its Storage settings, I edited the CD Sata Port so that it pointed at my actual CD slot, and I made sure that it was first in the list, so that we would boot from it.
-
I started the virtual machine, and after a heart-stopping pause it did indeed begin booting from the install disc! After a while the familiar installer interface appeared.
-
As I mentioned earlier, the virtual Mac’s internal hard disk was not formatted, so there was no place to install to. So I chose Utilities > Disk Utility and formatted that hard disk, which was visible to Disk Utility under these circumstances.
-
Now I configured and performed the installation. It went really slowly, perhaps because of something else about my settings. But I didn’t care about speed.
-
In real life, what should happen is that when the installation is over, the computer will automatically restart, booting from the newly installed system. Under Virtual Box, however, restarting doesn’t work all by itself, so when the installation was over, the virtual machine’s screen vanished and the machine was listed as Aborted. I took advantage of this moment to edit its Storage settings again: I deleted the CD Sata Port, so that we would now boot from the internal disk.
-
I started the virtual machine again, and sure enough, it booted from the internal disk! The server software’s initial configuration screens appeared, and I was able to proceed through them, eventually ending up with the familiar Mac screen with a menu and a Dock. This virtual Mac was also able to see the Internet, so it was able to update itself to 10.6.8, which requires a restart; again, this meant that it shut itself down and I had to start the virtual machine manually. The virtual machine also then spent some time creating its Spotlight database, and then settled down into a neutral state.
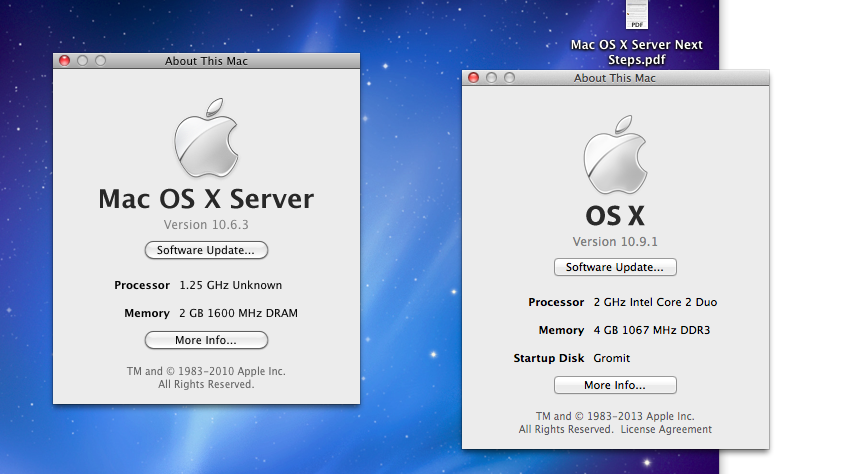
Here is a screen shot of Snow Leopard Server running virtually on my Mavericks machine, with Get Info boxes to prove it:
What I’m finding with Virtual Box is that startup is a bit iffy; sometimes the magic works and sometimes it doesn’t. However, when it does, we boot into a very familiar-looking world (except, of course, that the Dock is full of server software I know nothing about). And we don’t really need to reboot often, because Virtual Box lets you quit and freeze the virtual machine’s state.
Also, the virtual machine is rather slow. That’s disappointing, but not a serious concern as long as it allows me to get work done when needed; time will tell. And it may be due to my acceptance of the default settings; perhaps future tweaks will improve things. At the moment, I’m just glad to have it working at all.
Footnote: It seems probable that eventually I’ll have to virtualize under a commercial application such as Parallels, in which case these instructions and these may prove useful.
This page prepared
February 24, 2014
by Matt Neuburg, phd = matt at tidbits dot com,
using RubyFrontier.
RubyFrontier is a port, written in the Ruby language,
of the Web-site-creation features of UserLand Frontier.
Works just like Frontier, but written in Ruby!
Download RubyFrontier from
GitHub.